Plant care
Fiddle leaf fig brown spots: a pattern-first read before you change anything
· Updated
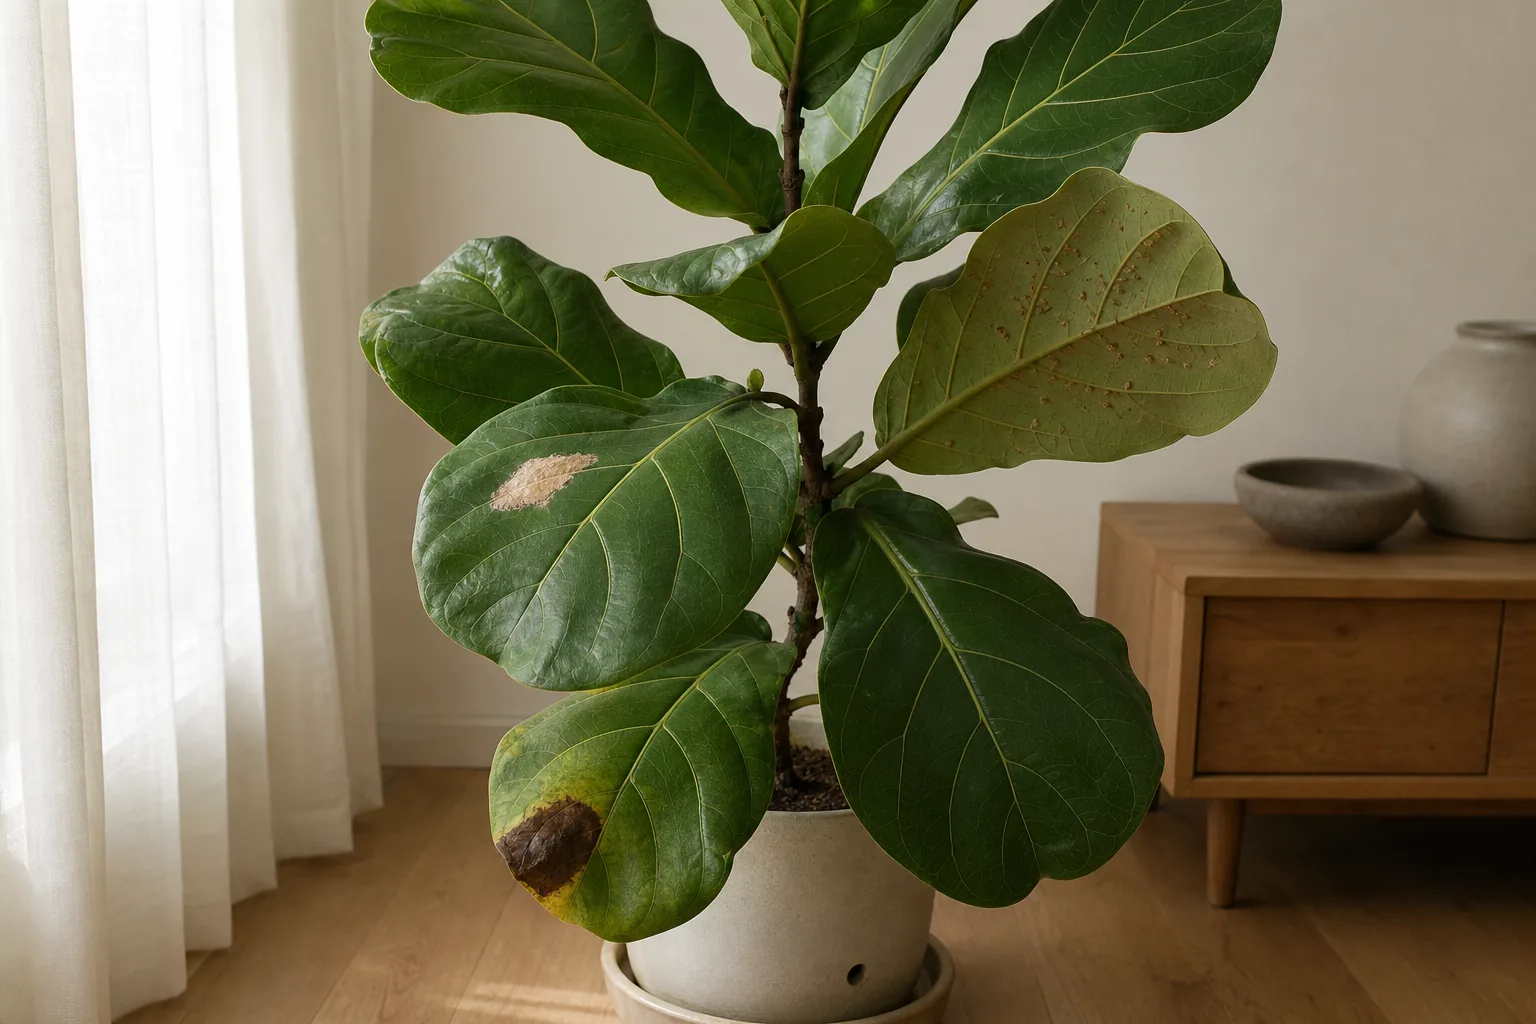
Brown spots on a fiddle leaf fig usually fall into a small number of recognizable visual patterns, and the pattern often tells you more than the spot itself does. Before you change anything, read four things in order: where the spot sits on the leaf, where it sits on the plant, what the soil is doing right now, and what the room is doing right now. Once you can match a pattern to a probable cause, change one condition at a time, and start with the safest moves: watering rhythm, drainage, airflow, and light.
One expectation up front. Damaged brown tissue will not green back up. The marks you see today are records of dead cells at the moment stress happened, and they will stay. The point of any change you make is to stop new spots from forming, not to undo the ones that are already there.
Start with four short reads before you change anything
Reading the spot is a sequence, not a single glance.
- Where on the leaf. The spot’s location on the leaf surface is the first clue. Edge and tip browning is usually a different problem from interior or center-of-leaf spots, and is covered separately by the brown-tips diagnostic.
- Where on the plant. Spots on the lowest, oldest leaves are different from spots on the newest leaves. Spots that show up on only one side of the plant are different from spots that show up everywhere.
- What the soil is doing. Lift the pot. Press a finger into the soil. Note whether the pot drains, whether water sits in the cachepot, and how the soil smells when you water.
- What the room is doing. Note the light angle, whether a window gets direct sun, whether a heater or AC vent blows across the plant, and how the room felt during the past week.
These four reads narrow the field before you reach for a watering can, a move, or a treatment.
Pattern 1: dark, soft spots starting from lower leaves in soil that stays wet
This is the pattern to check first, because the leaves are usually the last place it shows up. Lower or older leaves develop dark brown, almost black, spots that feel soft or slightly mushy at the edges. The spots often start near the center or base of the leaf, expand outward, and may be joined by yellowing before the leaf drops.
The soil tells the rest of the story. If the pot feels heavy days after watering, or the soil still feels cool and damp below the top centimeter, the root zone has stayed wet too long. Other clues include standing water in the cachepot, no drainage hole in the grower pot, soil that has compacted or pulled away from the pot sides, and a sour or stagnant smell when you water. The role of the pot itself is covered in the drainage and cachepot setup guide.
This is a root problem showing up on the leaves, not a leaf problem in itself. The right first moves are about soil and water. Confirm the pot drains, let the top several centimeters of soil dry between waterings, and follow the overwatered vs underwatered inspection order before assuming either extreme. The fiddle leaf fig care guide covers the baseline expectations for watering rhythm and placement that make pattern reading possible.
Pattern 2: pale, papery patches on the side facing the window or sun-heated glass
Sun scorch on a fiddle leaf fig looks different from a root-zone spot. The patch is dry, papery, and bleached rather than soft and dark. It usually appears on the brightest-exposed surface of the leaf, often the side nearest a window or a sun-heated pane, and it tends to follow the outline of where the light hits rather than the leaf veins.
This pattern is common after a move into a brighter room, after the sun angle shifts with the seasons, or when a plant that has been against a window all winter suddenly gets longer direct afternoon light. Sun-heated glass can also produce papery patches in a shape that matches the window rather than the leaf.
The fix here is light management, not treatment. Pull the plant back from the window by a foot or two, or filter the light with a sheer curtain. The drafts, vents, and sun-heated glass guide explains how room microclimates shape this kind of patch, and the natural light reading guide walks through the shadow test to size up the spot. Avoid rearranging the plant while you decide. Fiddle leaf figs prefer one stable placement, and small, deliberate adjustments beat frequent moves.
Pattern 3: small reddish-brown specks, sometimes raised, on leaf undersides
This pattern is oedema, a physiological disorder rather than a contagious disease. It happens when roots take up water faster than the leaves can transpire it, often after a cool, cloudy stretch followed by a thorough watering. The pressure pushes small, fluid-filled blisters or rough spots into the undersides of mostly older leaves. The spots are usually uniform in size, often clustered along the veins or near the leaf margins, and they may feel slightly raised.
Oedema spots do not spread from leaf to leaf like a pathogen. They are a record of one event in the plant’s water balance. Stabilizing your watering rhythm and gently improving airflow in the room usually resolves them. You will not erase the existing bumps, but new growth should come in clean.
A note on something that looks similar: small nicks or pressure points on a leaf can leave a reddish-brown speck that is neither oedema nor a fungal spot. These usually appear singly or in small groups rather than in the dense, vein-aligned clusters typical of oedema.
Pattern 4: irregular lesions with defined darker margins, sometimes with a yellow halo
This is the pattern that worries people most, and it is the one where you should be most careful not to self-diagnose. Haloed brown spots can be produced by more than one pathogen, and visual inspection alone cannot reliably separate them. Fungal and bacterial leaf spots both favor leaf wetness, high humidity, and still air, but they do differ in some useful visual cues.
Bacterial leaf spots on Ficus often produce angular spots whose shape is limited by the leaf veins. They can look watery at the margin and feel soft. Fungal leaf spots tend to be rounder, can develop defined margins, and under humid conditions some produce concentric rings or darker borders. Both can produce a yellow halo around the brown center.
Halo color, margin sharpness, and lesion texture are necessary but not sufficient clues. A haloed lesion that is enlarging over days, especially with leaf drop or a sour smell from the soil, is the signal to escalate to a local nursery or county extension office for confirmation before reaching for any product. In the meantime, isolate the plant from other houseplants, water at the soil rather than over the foliage, and improve airflow. The general leaf-spots triage flow walks through the same decision in a species-agnostic frame.
Pattern 5: brown patches that match a physical event
Fiddle leaf figs have large, stiff leaves that are easy to bend, crease, or press against a wall, shelf edge, or window mullion. A brown patch that lines up with a fold, a sharp edge, or a regular path through the room is almost always mechanical. The patch is usually dry and may follow a linear shape rather than a circular or angular one.
This pattern is not contagious and will not spread. The fix is positional. Pull the plant a few inches away from the wall, rotate it so a leaf is no longer pressed against a frame, and stop moving it back and forth. Mechanical spots are a useful reminder of why the care guide’s “place once and stop rearranging” message matters.
Pattern 6: spots only on the newest leaves, or only after a recent change
A fiddle leaf fig that was bought, shipped, moved, repotted, or shifted from one room to another in the last two to four weeks often shows a few small brown spots on the newest growth. The rest of the plant usually keeps producing healthy leaves, and the surrounding tissue on the affected leaf continues to grow normally.
Adjustment spots are a watch-and-wait pattern. Do not chase them with a treatment. Keep the watering rhythm stable, keep the light stable, and resist the urge to repot, fertilize, or relocate again while the plant settles. The new-plant acclimation guide explains what to expect in the first two weeks and why a single early spot is often misread as disease. If the spots keep appearing on new leaves for more than a month, or if older leaves start showing the same pattern, move back to one of the other patterns and re-read.
What to change first, what to wait on, and what to ask a local expert
The order of operations once you have matched a pattern is straightforward.
Change one condition at a time. The most common and safest first move is watering rhythm, because it covers the root-zone pattern and most oedema cases at once. Lift the pot to feel weight, water only when the top several centimeters of soil are dry, and confirm the pot drains. The watering-by-observation guide is the standard to reset to.
Re-read after a week. If the spotting has stabilized and new leaves are coming in clean, keep the new rhythm. If new spots are still appearing, change the next most likely condition on your read: light and glass distance for a sun-scorch pattern, airflow for an oedema pattern, or physical position for a mechanical pattern.
Escalate when spots are spreading or have haloed margins. A local independent nursery, a master gardener program, or your county extension office can look at the actual plant, the pot, and the room. Bring a fresh leaf with both healthy and affected tissue and notes on recent watering, light, and any product you have applied.
Do not treat a haloed, spreading spot with a fungicide, bactericide, or home mixture without confirmation. Many indoor-use pesticides carry label language that requires ventilation or PPE, and the wrong product indoors can add stress to the plant and to the room.
The goal at every step is to stop the next spot from forming. The existing brown marks are permanent records of what the plant has already been through, and the new growth you coax out under more stable conditions is the real measure of whether your read was right.
Sources
- Ornamental Ficus Diseases: Identification and Control in Commercial Greenhouse Operations (UF/IFAS PP308)
- Ficus Diseases (Penn State Extension)
- Diseases and Disorders (NC State Extension Gardener Handbook)
- Oedema (Missouri Botanical Garden)
- Edema (Wisconsin Horticulture, University of Wisconsin Extension)