Plant care
Water propagation for houseplants: a calm, observation-first guide
· Updated
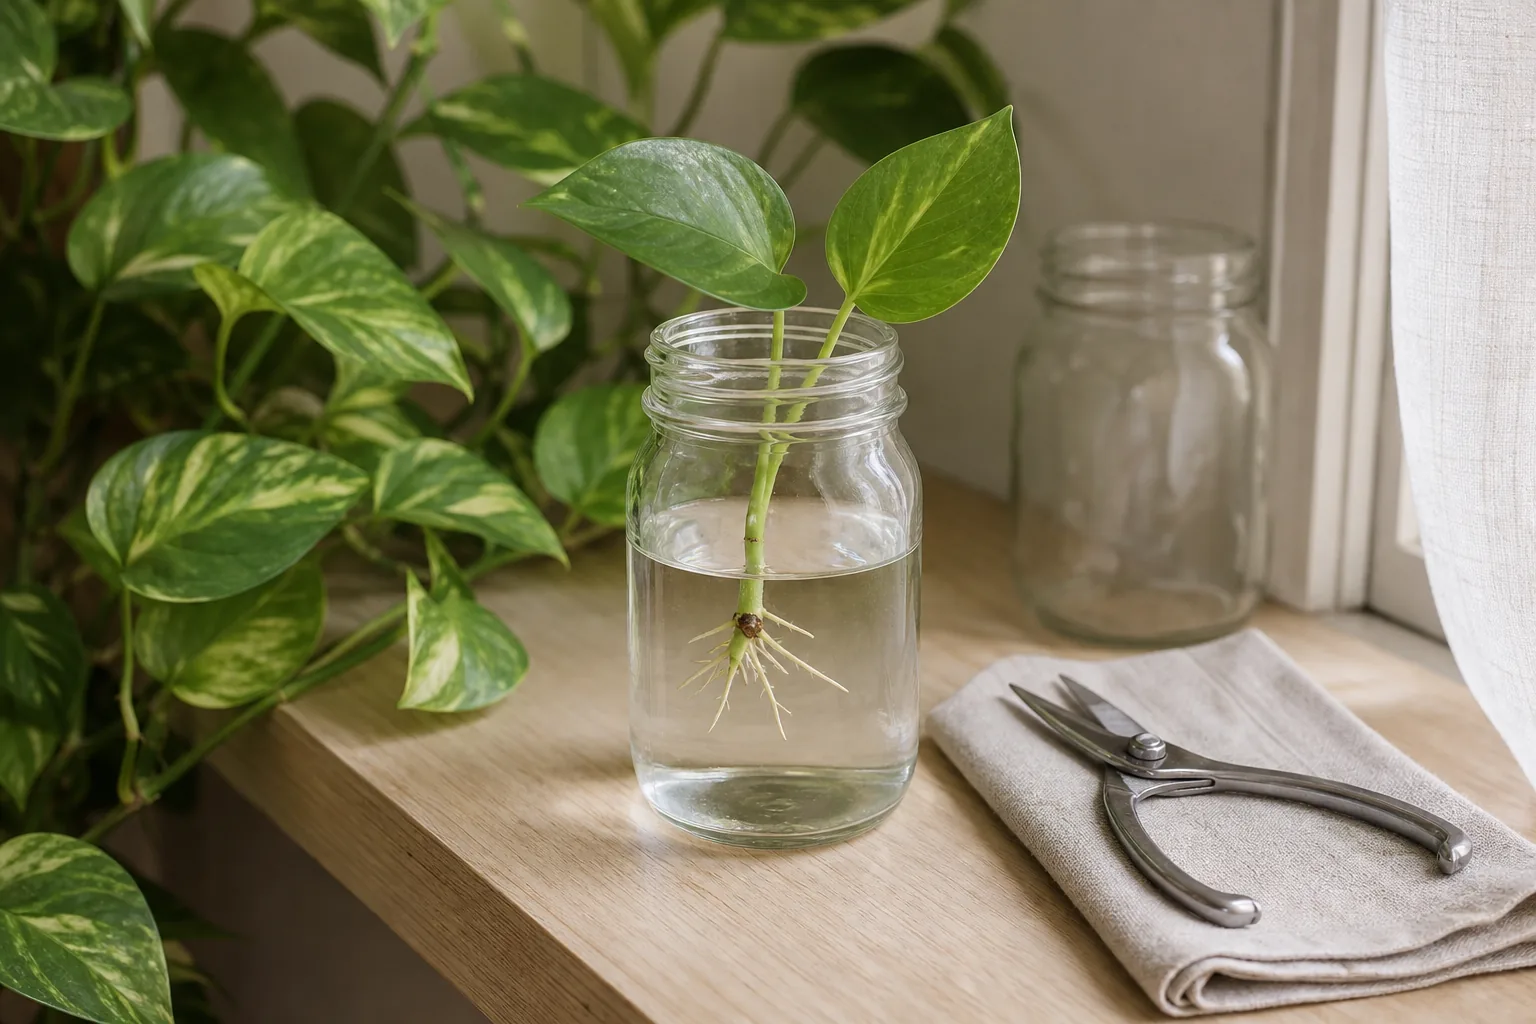
To propagate a houseplant in water, take a healthy stem cutting just below a node, place it in a clean jar of room-temperature water with the node submerged and the leaves above the waterline, keep it in bright indirect light, and refresh the water on a roughly few-day rhythm. Once the roots are pale, firm, and a few centimeters long, you can either keep the cutting in water for the long term or move it into a well-draining potting mix, knowing the water-to-soil step is a real adjustment rather than a guaranteed transplant. That is the method in one paragraph. The rest of this guide walks through each step, names the conditions that change the answer, and points to deeper guidance for the parts where most beginners stall.
What water propagation is, and why people use it
Water propagation is a way to root a stem cutting by suspending it in plain water instead of potting mix. The new roots grow from the node, the small joint on the stem where leaves and aerial roots emerge. The botanical term for these is adventitious roots, which simply means roots that form from non-root tissue.
People choose this method because it asks for very little equipment and turns what would be invisible underground work into something you can watch happen. A single trailing vine becomes several jars, each a possible shelf plant, gift, or backup. The honest trade-off is that roots formed in water are commonly described as adapted to water rather than to soil, and many growers find that the move from a jar to a pot is an acclimation step rather than a simple repot. That matters and is worth coming back to.
What you need to get started
You do not need a propagation station, hormones, or grow lights. A working setup looks like this.
- A clean glass jar or small vase, washed with hot soapy water and rinsed well.
- Enough room-temperature water to cover the node without reaching the leaves.
- A sharp, clean cutting tool, such as scissors, pruners, or a craft knife, wiped down with rubbing alcohol or hot soapy water and dried before you cut.
- A healthy parent plant with a stem long enough to spare a piece.
- A spot with bright, indirect light, away from cold window glass and hot air vents.
Two small extras make life easier. A bottle brush helps with narrow jars. A piece of tape and a marker help if you are propagating several cuttings at once and want to remember which is which.
Choose a healthy stem and find the node
Start by looking at the parent plant. Pick a stem with active growth, firm leaves, and no obvious pests or disease. Avoid stems that are stretched from low light, yellowing from a recent move, or showing sticky residue, webbing, or spots. A stressed parent makes a stressed cutting, and a sick one carries its problems into the jar.
Then find a node. A node is the small bump or ring on the stem where a leaf attaches, and where aerial roots sometimes emerge on vining tropicals. The space between two nodes is called an internode. Roots form at or near the node, so a cutting without a node usually sits in water for weeks and produces nothing. Most beginners’ failures come back to this one point.
A simple way to locate a node is to follow a leaf stem back to where it joins the main stem. That joint, with its slight swelling and a small line or ridge, is the node. On a mature pothos or philodendron, you may see a small brown nub already poking out. That is the same structure.
Make the cut
Take the cutting in the morning, after the parent has been watered the day before and before the day heats up. A hydrated cutting starts life with a small moisture reserve, which is one of the few things you can control before the rooting period begins.
Cut just below the chosen node, at a slight angle, with a clean tool. The angle is cosmetic more than critical, but a slanted cut gives a slightly larger rooting surface and is easier to keep track of when you set the cutting in the jar. Remove any leaf that would sit below the waterline. Submerged leaves break down quickly and feed the bacteria that cloud the water.
If the parent is sick, struggling, or has active pests, hold off on propagating until you have dealt with that. A cutting from a stressed plant usually propagates the stress.
Set up the jar
Place the cutting in the jar so that the node sits underwater and the remaining leaves stay above the waterline. If multiple cuttings fit without crowding, fine. If they tangle, use two jars.
Fill with room-temperature water. Tap water is fine for most houseplants. If your supply is softened or unusually chlorinated and you have had trouble before, that is a separate conversation worth a closer look, but most readers can start with what comes out of the tap.
Put the jar somewhere with bright, indirect light and stable room temperature. A north- or east-facing windowsill often works, or a shelf a few feet back from a brighter window. Avoid direct sun on the glass, which can warm the water, encourage algae, and damage a tender stem. Avoid cold winter windows that chill the water overnight, and avoid the air directly above a heating vent. If you are unsure how bright a spot really is, learning how to read your room’s natural light helps you pick a spot where a propagation jar will actually thrive rather than just survive.
The first two weeks: what to watch
Treat the jar as a small system to observe rather than a calendar to run. Three signals are worth checking on a casual rhythm.
- The water. Clear water with no film on the surface is the healthy state. Cloudy water, a faint slime at the waterline, or a sour smell means it is time to refresh and rinse the jar.
- The stem at the waterline. It should stay green and firm. A soft spot, darkening, or a fuzzy ring at the water means trouble.
- The leaves above water. They should remain turgid, not wilted, drooping, or yellowing all at once.
Refresh the water on a rhythm rather than only when it looks bad. Cloudy water is a late signal, not an early one. A common range across popular guides is every few days, with warm rooms, dense jars, or fast-clouding containers pushing toward the shorter end. There is no single correct number, and the right cadence for your jar depends on the temperature, light, and crowding in your specific room.
Reading the roots: healthy growth versus rot
When new roots appear, they usually emerge as small white or pale tan nubs at or near the node, then lengthen and branch over time. Healthy water roots are pale in color, firm to the touch, and lengthen steadily over weeks. Their exact shade ranges from white to a creamy tan depending on the species.
Concerning signs include brown or black coloration, a soft or mushy texture, a foul smell, or a slimy and darkened stem where the roots meet the waterline. These are signs that the rooting environment has become stagnant or airless, and the cutting is starting to rot.
If rot appears early, the cutting can sometimes be saved. Pull it out, trim the stem a centimeter or so above any rotted tissue with a clean tool, refresh or replace the water, and rinse or replace the jar. Some cuttings recover. Others do not, and that is a normal part of the process.
How long rooting actually takes
This is the question most beginners really want answered, and the honest answer is that it varies.
Easy water-propagation subjects like pothos, heartleaf philodendron, and tradescantia can show visible roots in a week or two under good conditions, with a working root system within a month or two. Slower-growing or less vigorous cuttings can take many weeks. Cooler rooms, lower light, and a tired parent plant all push timelines longer. The same cutting on a warm, bright shelf will usually root faster than the same cutting on a chilly one.
If a cutting is still firm, the water is clear, and a few weeks have passed with no sign of roots at all, it is reasonable to take a fresh cutting from a more vigorous section of the parent plant and start over.
When the cutting is ready
There are no extension-issued numbers for “ready to pot up,” but the popular heuristic clusters around pale, firm roots that are roughly two to five centimeters (about one to two inches) long and starting to branch. Root length is one signal, not the only one. Root color, root branching, the season, and what you actually want to do with the cutting all matter.
From here there are three honest options.
- Keep it in water. Many common houseplants can survive in a jar of water for extended periods with periodic refreshes, though growth is usually slower than in potting mix and long-term water-only living will eventually deplete nutrients in the water, so an occasional very-dilute feed or a move to soil is worth considering.
- Move it to potting mix. This is the more ambitious path, and it counts as an acclimation step rather than a simple repot. If you go this route, choosing a houseplant potting mix that drains well is the first real decision you will make, and the post-potting period has a lot in common with acclimating a new houseplant.
- Wait. If the root system is still small and you are not in a hurry, another week or two in the jar costs nothing.
Limitations and honest expectations
Water propagation is not the right method for every houseplant. Succulents and most cacti, many woody-stemmed plants, and most ferns are widely considered poor candidates because their stems tend to rot in standing water rather than form roots. For these, a drier rooting medium or a different method is the usual path.
Clumping species like snake plant, ZZ, and most aroids that grow from offsets are a separate category. They are usually propagated by division, or by potting small plantlets directly into mix, rather than by suspending stems in water. If you have a trailing pothos or a bushy heartleaf philodendron, water propagation is a reasonable first method. If you have a succulent rosette or a spider plant baby with its own little root nub, a different path fits better.
Even with healthy technique, some cuttings fail to root. A tired parent plant, a cutting without a node, contaminated water, or simply the wrong time of year for that species can all lead to a cutting that sits in the jar and slowly declines. Treating each cutting as one experiment out of several keeps the occasional failure in proportion.
Common beginner mistakes
A few patterns come up often enough to be worth naming.
- Submerging the leaves. Submerged leaves break down quickly and cloud the water.
- Putting the jar in direct sun. Direct sun warms the jar, encourages algae, and can damage a soft stem.
- Refreshing water only when it looks bad. By then, microbial growth is already a problem.
- Forgetting the node. A cutting without a node rarely roots, no matter how healthy the rest of the stem looks.
- Taking a cutting from a stressed or pest-ridden plant. The new cutting inherits those problems.
- Expecting every cutting to root. Many will. A reasonable share will not, even with good technique.
Where to go next
Water propagation is one method, not the whole craft of houseplant care. The useful next steps depend on what you want to do with the cutting you just made.
If you are still working out where to cut and what counts as a node, a guide on identifying nodes will help you read a stem more confidently. If your jar is going cloudy and you are not sure how often to refresh, a closer look at water changes breaks it down by signs rather than by a calendar. If your roots are forming and you want to pot up, the readiness and transfer guides walk through that transition in detail, including acclimation rather than a simple repot. And if a cutting is going soft or smelly, the guide on cuttings rotting in water covers what to try and when to start over.
For species-specific context, our pothos care guide covers the parent plant most readers start with, and it is a useful companion for the first year after your cutting goes into soil. If you have a heartleaf philodendron, our heartleaf philodendron care guide covers another frequent first subject. And if your plant is a spider plant and you are looking at a small plantlet with its own little root nub, our spider plant care guide covers what to do with offsets instead of stem cuttings.
The framing throughout this guide has been the same: treat the jar as something to observe. Read the cutting, read the water, read the roots, and the rest is mostly patience and a calm room.
Sources
- University of Illinois Extension. From one to many: a beginner’s guide to plant propagation.
- Penn State Extension. Propagating houseplants.
- Purdue University. New plants from cuttings (HO-37-W).
- NC State Extension. Propagation (Extension Gardener Handbook, ch. 13).
- Michigan State University Extension. Moisture management during vegetative cutting propagation.