Plant care
Thrips on houseplants: reading the damage before choosing a response
· Updated
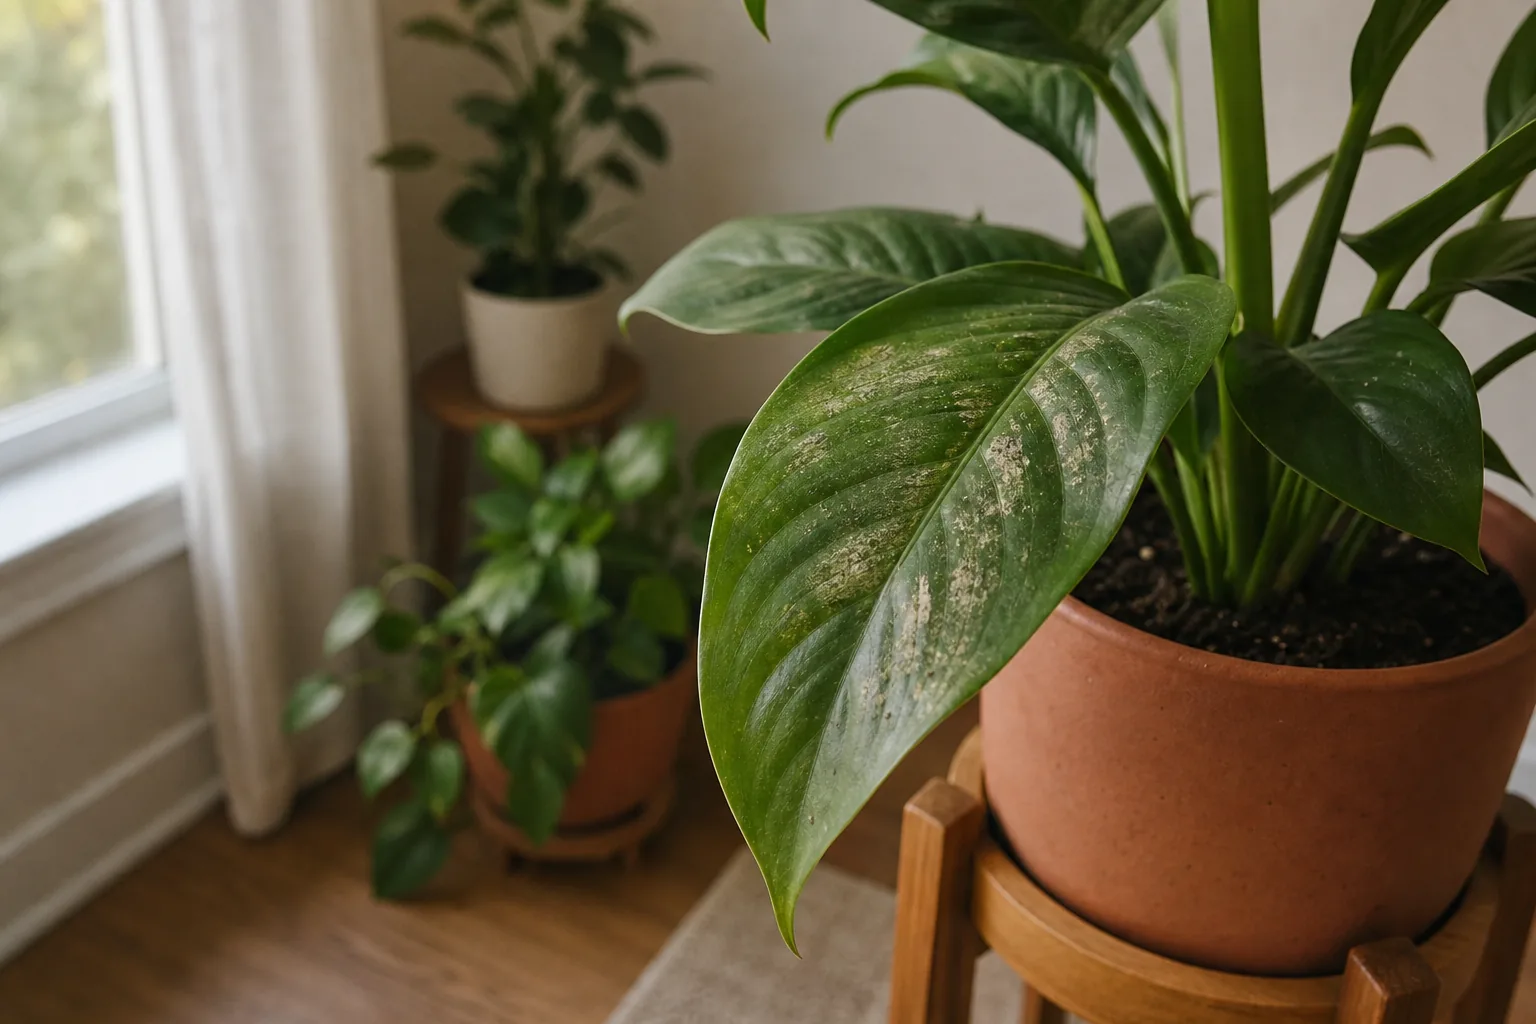
If you see fine silvery or bronze patches on the leaves, scattered tiny dark specks, and new growth that comes in twisted or scarred, thrips are a strong suspect. Thrips on indoor plants leave a recognizable damage signature even when you cannot see the insects themselves, because the insects are tiny and tend to hide in new growth, flowers, and leaf crevices. Confirm what you are seeing with a simple tap test, isolate the plant, and inspect its neighbors before reaching for any product.
That order matters: identify first, isolate second, then choose a response. A single treatment rarely clears thrips on its own, so the next two to three weeks of careful observation usually do more work than any spray bottle.
What thrips are and why they are hard to see
Thrips are tiny, slender insects, usually about 0.5 to 2 millimeters long, often pale yellow, brown, or black, and shaped a little like a grain of rice. Adults have narrow fringed wings and will fly or launch short distances when disturbed.
Several species show up indoors. Western flower thrips and onion thrips are among the most commonly reported pest thrips in North American homes, with Echinothrips americanus also widely recorded on ornamentals indoors, and greenhouse thrips appearing on foliage houseplants. Rather than commit to a single “most common” species, it is more useful to think of thrips as a small, mixed group, and to confirm by what the plant looks like rather than by which species it is.
The damage pattern thrips leave behind
Thrips feed by rasping the leaf surface and sucking the released contents. That feeding leaves three clues worth learning to spot:
- Silvery or bronze patches that look like fine scratches or streaks, often easier to see from certain angles in raking light.
- Tiny dark specks of frass, which is insect excrement, sitting on the leaf surface near the damage. The frass is often easier to see than the insects themselves.
- Distorted, scarred, or aborted new growth, especially on the newest leaves and on flower buds.
Heavy feeding can lead to leaf curl, scarring that does not grow out, and flowers or buds that brown and drop before opening. Some thrips species also excrete honeydew, so a light stickiness on nearby leaves is worth noting, though it points to several sap-feeders and is not unique to thrips; our guide to what honeydew on a houseplant can mean walks through that distinction.
Confirming thrips: the tap test and where to look
The fastest way to confirm what you are seeing is to gently tap or shake a suspect leaf or flower over a sheet of white paper. If thrips are present, you will see small slender insects drop onto the paper and scuttle rather than fly away. They move quickly but they do not jump far.
A magnifier or a phone camera in macro mode helps, because at this scale seeing a body, antennae, and fringed wings changes the diagnosis from “maybe” to “yes.”
Where to look on the plant:
- The newest, softest leaves and unopened buds.
- The undersides of leaves and the spots where a leaf curls under itself.
- Open flowers, including small ones, which thrips often prefer over leaves.
- The soil surface and the top edge of the pot, where adults can shelter.
Check the plants sitting closest to the suspect plant at the same time. Thrips spread by flight and by contact, and a single infested plant usually means the rest of the collection deserves a quick look.
Separating thrips from common lookalikes
The damage pattern is the single most useful clue. Two pests and one non-pest problem tend to get confused with thrips.
Spider mites are the most common look-alike. Their feeding produces fine pale stippling, clusters of tiny dots that can coalesce into a bronzed look, often starting on leaf undersides and sometimes accompanied by fine webbing. Thrips damage looks streaky and silvery with dark frass, and there is no webbing. If you can spot the insects, thrips are slender and rice-grain-shaped while spider mites are tiny round dots that move slowly. Our guide to identifying spider mites on houseplants walks through that comparison in more detail.
Broad or flat mites also distort new growth, but they are nearly invisible without strong magnification, do not leave frass, and the damaged tissue tends to pit, blister, and blacken. If new growth is distorted but you cannot find any insects or frass with a magnifier, broad mites are a possibility worth raising with a local nursery or extension office.
Fungus gnats are often mentioned alongside thrips, but they are a different problem in a different place on the plant. Fungus gnat adults are dark, mosquito-like, and fly up from the soil when a plant is moved. They do not damage foliage. If the insects are around the pot rather than on the leaves, fungus gnats are the more likely cause; our fungus gnats post covers that insect in more detail.
Scale insects sometimes get swept into the same conversation because they are sap-feeders, but they sit still as small bumps on stems and leaves and do not rasp the surface into silvery patches. If the thing you are seeing does not move and looks like a raised bump, the scale identification guide is a better fit. Mealybugs, the other common indoor sap-sucker, show up as small white cottony tufts rather than as dark specks or streaks; the mealybug identification and management post covers the differences.
Non-pest leaf damage, including mechanical abrasion, mineral residue from hard water, and edema, can mimic feeding marks but usually produces more uniform patterns or marginal discoloration without the scattered dark frass specks that thrips leave behind. Our leaf-spot triage guide helps sort pest from non-pest patterns when the picture is unclear.
A photo in good natural light helps. Treat the plant based on which diagnosis matches the most clues at once: damage pattern, frass, the look of new growth, and the tap test.
Why one response usually is not the end
Thrips pass through six stages: egg, two larval instars, prepupa, pupa, and adult. Eggs are laid into plant tissue. The two larval stages feed on leaves and flowers and are responsible for most of the damage you see. The prepupal and pupal stages do not feed and generally occur in the soil or in leaf litter, then adults emerge and start the cycle over.
Egg-to-adult takes on the order of two to three weeks under warm indoor conditions, and pupal stages alone last anywhere from a couple of days to nearly two weeks depending on temperature. That hidden pupal window is the main reason a single treatment rarely feels like the end of the problem: a follow-up response timed for when those pupae re-emerge as adults usually does more than a strong first application.
Isolate the plant and check its neighbors
Move the suspect plant to a room or a corner away from the rest of the collection. A bathroom, a spare room with a closed door, or a table that other plants do not share all work. Keep it isolated while you observe, and check any plants that were touching it or sitting next to a window it sat near.
Isolation buys time for the rest of the collection and protects plants that may already be hosting thrips you have not noticed yet. The detailed routine lives in our guide to isolating a new or sick houseplant; the short version is to separate the plant, give it its own watering can and saucer, and wash your hands before handling healthy plants.
Reduce the population before any product is considered
A few sanitation steps do not need a label and often do most of the heavy lifting:
- Prune and bag the most damaged leaves, especially the worst of the distorted new growth. Thrips prefer soft tissue, so removing the most attractive leaves reduces their options.
- Rinse the foliage under tepid water in a sink, shower, or outdoors, supporting each leaf with a hand so it does not bend. Pay attention to leaf undersides and the inside curls of new leaves.
- Refresh the top layer of potting mix where pupae can shelter near the surface, and discard the removed material in a sealed bag.
- Drop any open flowers or unopened buds on the suspect plant into the trash, since flowers are a favorite feeding and hiding site.
- If the room is dry, raise humidity in the isolation space where it is reasonable to do so. Higher humidity may discourage most thrips species as well as spider mites, though it is not a stand-alone solution.
These steps reduce the active population and the density of hidden stages. They are not a one-shot cure, but they make whatever you do next more effective, and they do not rely on a product that may not have an indoor ornamental use on its label.
What any product you consider must say on its label
Thrips are persistent enough that some readers will want to use a product, and that is reasonable. Anything you consider needs to clear three checks before use:
- The label has to permit use on indoor ornamental plants, not just outdoor ornamentals or food crops. Indoor use has different exposure assumptions.
- The application interval and rate on the label must match what you actually do. Indoor ornamentals often have a narrower set of allowed products and intervals than outdoor ornamentals.
- For homes with pets, children, or asthma, follow the label precautions and ventilation guidance and contact poison control or another qualified local resource if anyone is exposed. Safety claims for specific products belong on the label, not in a blog post.
Specific active ingredients and rates come from current university extension publications and from the product label itself, not from memory or a forum thread. Treat any named product or rate you find outside those sources as unverified.
Re-check the plant over the next two to three weeks
Because pupae shelter in the medium or leaf litter and emerge later, schedule a few re-checks rather than declaring victory on the first quiet day.
- Do a tap test on the most attractive leaves once a week.
- Watch the new growth as it unfolds. Thrips scarring on a leaf that was tiny and soft last week is the cleanest evidence they were there.
- Repeat sanitation steps as new damaged leaves appear, and time a second response a couple of weeks after the first if the label permits, because adults emerging from the medium can reappear even when the foliage looks clean.
If the plant still shows silvery patches, frass, or distorted new leaves after two to three weeks of consistent observation and sanitation, it is a reasonable moment to involve a local nursery, a master gardener program, or your state’s extension office for an ID and a recommendation that is current for your region.
When to ask for an ID from a local resource
Some situations are worth handing off to someone with a magnifier and a regional view:
- New growth is heavily distorted but you cannot find any insects or frass even with magnification.
- Multiple plants in the collection are showing damage and sanitation steps are not slowing it down.
- The same plant has been treated several times and the silvery patches keep coming back.
- Flowers abort or discolor quickly and the plant is a flowering species you care about preserving.
A regional extension service, a botanical garden, or an experienced local nursery can confirm the species, suggest label-appropriate products for indoor ornamentals in your area, and help time a follow-up response around the pupal stage.
Sources
- University of Maryland Extension — Thrips in home gardens: https://extension.umd.edu/resource/thrips-home-gardens
- UC Statewide IPM — Thrips: https://ipm.ucanr.edu/home-and-landscape/thrips/
- University of Georgia IPM — Thrips: https://ipm.uga.edu/2025/09/12/thrips/
- University of Kentucky Entomology — Onion and Western Flower Thrips: https://entomology.mgcafe.uky.edu/ef328
- NC State Extension — Twospotted Spider Mites on Landscape Plants: https://content.ces.ncsu.edu/twospotted-spider-mite-2