Plant care
Identifying and managing mealybugs on houseplants: a calm, layered approach
· Updated
Quick answer: what mealybugs look like and what to do first
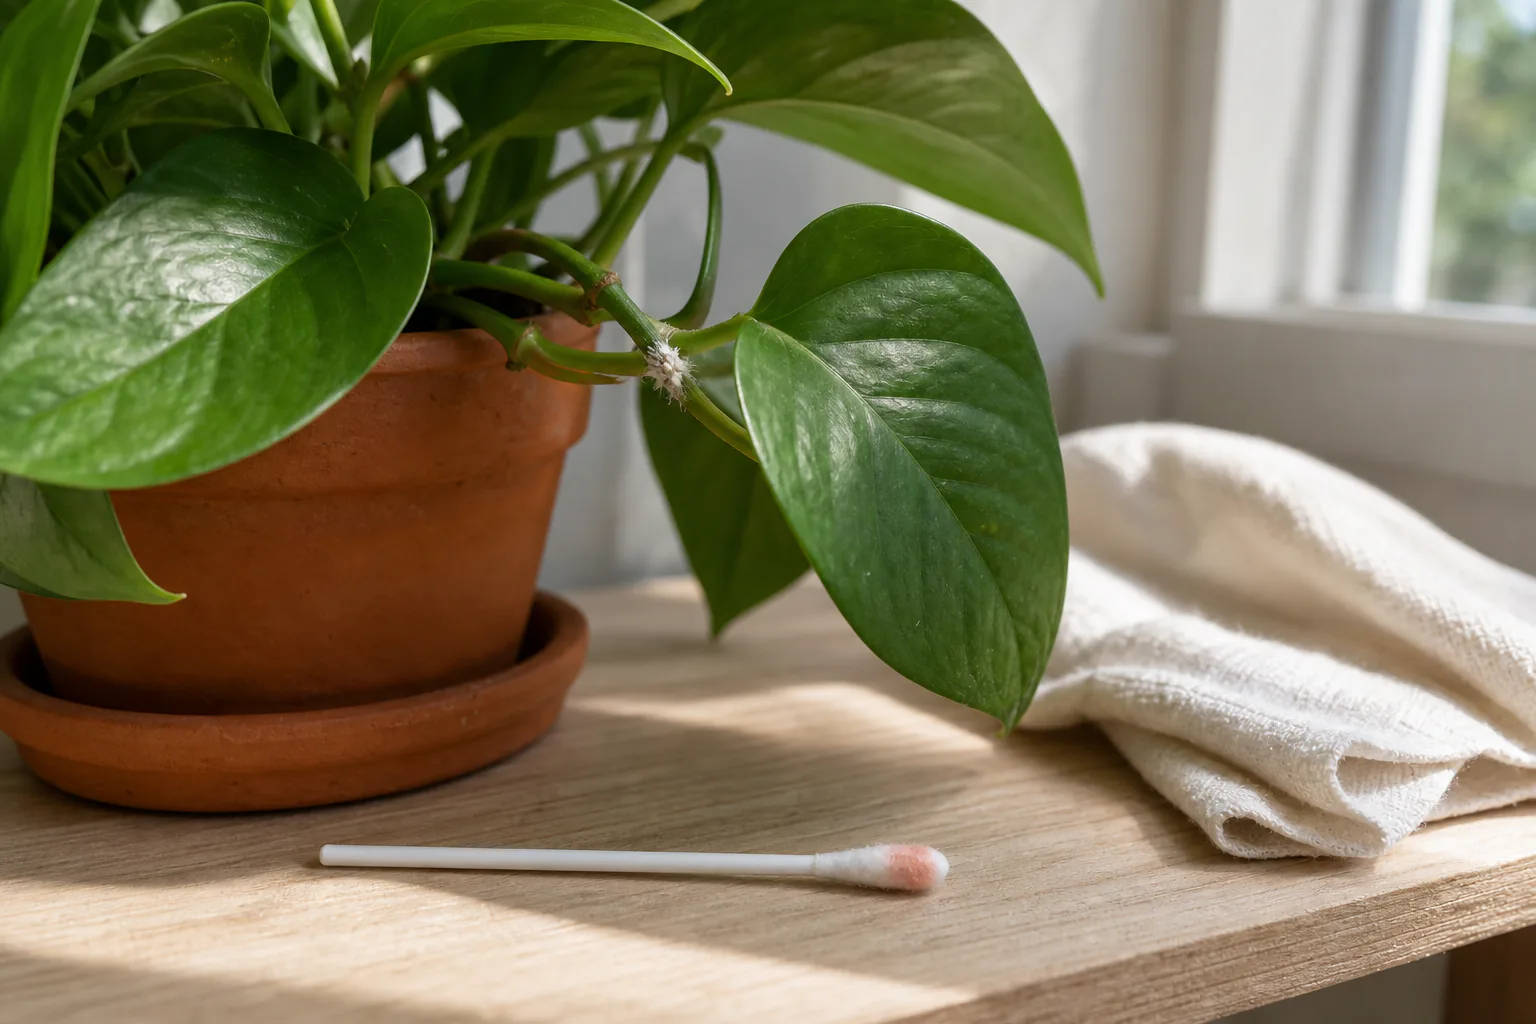
If you spot small, cottony white clumps in the leaf joints or along the stems of a houseplant, pause before you do anything else. The simplest way to confirm what you are looking at is to touch the white clump with a cotton swab. If it smears and reveals a soft, slow-moving insect underneath, that is almost certainly a mealybug.
Mealybugs are tiny, soft-bodied insects covered in a white, waxy, cottony coating that the insect itself produces. The wax is part of the animal, not dust or mold. UC IPM and several university extension services describe them as small (often about an eighth of an inch or smaller), oval, segmented, and slow-moving, with a pinkish or pale body visible when the wax is disturbed. The species most readers encounter indoors is citrus mealybug, but the practical response is the same across the common indoor species.
Once you have confirmed the sighting, the calm first response has three parts:
- Isolate the plant away from your other houseplants.
- Remove what you can see by hand or with a cotton swab dipped in 70 percent isopropyl alcohol, after testing one leaf first.
- Clean nearby surfaces and tools before touching any other plant.
If the infestation is heavy, recurring, or has reached the roots, that is a normal reason to contact a local nursery, master gardener, or extension office rather than to keep escalating at home.
Is that cottony stuff actually mealybugs? Look-alikes to rule out
White on a houseplant is not automatically a mealybug. Before treating, take a minute to rule out the most common look-alikes, because the right next step changes with each one.
- Woolly aphids also produce white wax, but they are a different insect group, tend to be more mobile, and cluster on new growth. They are far more common on outdoor trees and shrubs than on indoor plants.
- Soft scale insects look like small stationary bumps or domes glued to stems and leaves. They do not come off as a cottony smear, and they do not move when prodded.
- Powdery mildew is a flat, dusty white fungal coating on leaf surfaces. It wipes off as a residue, not as an insect body.
- Mineral salt crust or perlite fragments show up on the soil surface. They are inert, do not move, and are not concentrated at leaf joints.
- Naturally fuzzy leaves, like those of African violets, are uniformly fuzzy across the whole leaf. That fuzz is normal leaf trichomes, present from the day you bring the plant home.
- Fungus gnats are a separate pest. They are small, dark, flying insects whose larvae live in moist soil. If you see flies around the pot rather than white tufts on the plant, the topic is different. Our guide to distinguishing mealybugs from fungus gnats walks through that comparison.
The most reliable differentiator is movement and location. If the white material is inert and is not concentrated at a leaf joint, it is probably not a mealybug.
Where to check on the plant
Mealybugs prefer sheltered spots where they are hard to see and where the wax stays dry. Before declaring a plant clean, spend a minute looking at the places they actually use.
- Leaf axils, the small angles where a leaf meets the stem, are the classic first stop.
- Stems and petioles, especially along newer growth.
- Undersides of leaves, particularly near the midrib.
- The soil surface and the top of the root crown, just under the rim of the pot.
- Tight crevices at the base of a plant that forms a rosette, such as African violets or prayer plants.
Lift the pot and peek at the soil line. Touch any white tuft with a cotton swab. If a faint pinkish-orange smear appears on the swab, you are looking at the insect body under the wax. That is the cleanest at-home confirmation you can get without a magnifier.
Step 1: isolate the plant to protect the rest of your collection
Mealybugs spread from plant to plant, and the spread is easy to miss because the wax makes them look like debris. As soon as you confirm what you are seeing, move the affected plant away from the rest of your collection. A separate room is ideal, but a few feet of distance on a different shelf, with no shared saucers or tools, is a real improvement.
This is the same logic you would use when bringing a new plant home. If you want a quick routine for incoming plants, our simple quarantine routine when you bring a new plant home covers the same ideas in a prevention-first frame.
A practical quarantine window is generally a few weeks, with re-inspection at each watering. We are deliberately not giving a single day count, because extension guidance varies by species and by how heavy the infestation is when you start.
Step 2: sanitation and manual removal with a swab
Manual removal is the first line of response, and it is worth doing carefully before you consider any spray.
Bag and bin the worst material. Heavily infested leaves or whole stems are easier to remove than to clean. Place the cuttings in a sealed bag and put them in the trash, not in a compost bin near other plants. UC IPM and the Royal Horticultural Society both describe pruning heavily affected parts as a normal extension recommendation.
Wipe tools and surfaces between plants. A cloth dampened with 70 percent isopropyl alcohol, or with mild soapy water, is enough for pruners, the rim of the pot, the saucer, and the shelf. This step matters because mealybug crawlers and egg sacs can ride on a tool or a finger from one plant to the next.
Use a cotton swab dipped in 70 percent isopropyl alcohol for visible individuals. This is widely cited practical guidance rather than a guarantee. The alcohol helps the swab pick up the wax and the insect underneath. It is a small-spot technique, not a whole-plant drench.
Test one leaf first. Alcohol can mark or burn sensitive foliage, especially on thin-leaved plants. Dab a single leaf at a leaf joint, wait 24 to 48 hours, and only treat the rest of the plant if that leaf shows no damage.
Repeat the inspection at every watering. Eggs and crawlers can show up after the first round of removal, which is why one careful session rarely finishes the job.
Step 3: when more than manual removal is needed
If manual removal and sanitation have not brought the population under control after a couple of careful rounds, it is reasonable to consider a broader treatment. This is the part where the product label matters more than any blog post.
The label is the source of truth. Any product you choose, whether it is a horticultural oil, an insecticidal soap, or a registered indoor pesticide, comes with a label that lists the plants it is registered for, the rate, the interval between applications, and the safety steps for people and the space. The extension sources we rely on describe the general integrated pest management ladder but do not endorse specific brands or rates, and we are not going to reproduce them either.
What to check on the label:
- That the product is registered for indoor houseplant use on the plant species you have.
- The rate, the interval, and any re-entry or ventilation language.
- Whether the product is meant for contact, which is what you want against mealybugs, rather than a soil drench meant for a different pest.
- Any safety language about people, pets, or ventilation. For pet-aware choices specifically, the pet-safety conversation is its own topic, and the product label is the right place to start.
If you are unsure which product is appropriate, your local nursery, master gardener program, or county extension office can point you to options registered for your state and your plant.
Monitoring after treatment and when to ask a local expert for help
A reasonable monitoring habit is to re-inspect the plant at each watering for several weeks, paying the same attention to leaf axils and the soil line that you paid at the start. Look for new white tufts, sticky honeydew on leaves, or a dark sooty mold growing on that honeydew, both of which are secondary signs that the colony is still active.
There are a few situations where the right move is to ask a local expert rather than to keep escalating at home:
- The colony keeps coming back after two or three careful rounds of manual removal.
- You see white tufts at the soil line or on the roots when you gently lift the rootball. Root mealybugs require a different approach, often including fresh medium and a clean pot.
- The plant is in decline despite treatment, with yellowing leaves or wilting that does not match its care.
- The same pest is showing up on multiple plants in the collection.
- You are unsure whether what you are seeing is actually a mealybug. Identification before treatment saves time and avoids unnecessary sprays.
Heavily affected plants can sometimes be simpler to dispose of than to keep treating. The Royal Horticultural Society frames disposal as a legitimate, evidence-based choice rather than a defeat, and we think that framing is fair.
Preventing mealybugs from coming back
Two habits do most of the prevention work.
Inspect and isolate new plants for a few weeks before placing them next to established plants. Mealybugs are a frequent hitchhiker on plants coming in from a greenhouse or a friend, and the same isolation habit that helps with one pest helps with most of the others. Our inspect-and-quarantine post has a simple routine if you want a checklist.
Keep an eye on conditions that favor mealybugs. They thrive in warm, sheltered spots, which is exactly what a typical indoor windowsill offers year-round. That is not a reason to change your home, but it is a reason to make a quick inspection of leaf axils part of your regular watering routine, so you catch a new colony when it is still small and easy to remove.
A short reminder of what to watch for: white cottony tufts in leaf joints, slow-moving soft insects underneath, sticky leaves with a faint black sooty mold, and ants running along stems on plants that summer outdoors. Any one of those is worth a closer look, not a panic.
Final thought
Mealybugs are a common indoor pest, and a small colony is something most readers can work through at home with isolation, sanitation, and careful manual removal. The traps to avoid are misidentification, treating the wrong plant or the wrong pest, and escalating to sprays before reading the current label. When in doubt, your local nursery, master gardener, or extension office is the right next call, and asking is not a failure. It is the normal end of the home checklist.
Sources
- UC IPM Home and Landscape: Mealybugs. University of California Statewide IPM Program. https://ipm.ucanr.edu/home-and-landscape/mealybugs/
- UC IPM Pest Notes: Mealybugs (PDF). University of California Statewide IPM Program. https://ipm.ucanr.edu/legacy_assets/PDF/PESTNOTES/pnmealybugs.pdf
- UC IPM Agriculture: Citrus Mealybugs. University of California Statewide IPM Program. https://ipm.ucanr.edu/agriculture/citrus/mealybugs/
- University of Wisconsin Horticulture Extension: Mealybugs. University of Wisconsin–Madison Division of Extension. https://hort.extension.wisc.edu/articles/mealybugs-2/
- Royal Horticultural Society: Mealybug (Glasshouse). Royal Horticultural Society. https://www.rhs.org.uk/biodiversity/mealybug