Plant care
Signs your houseplant is getting too much light
· Updated
Why “too much light” is its own diagnostic question
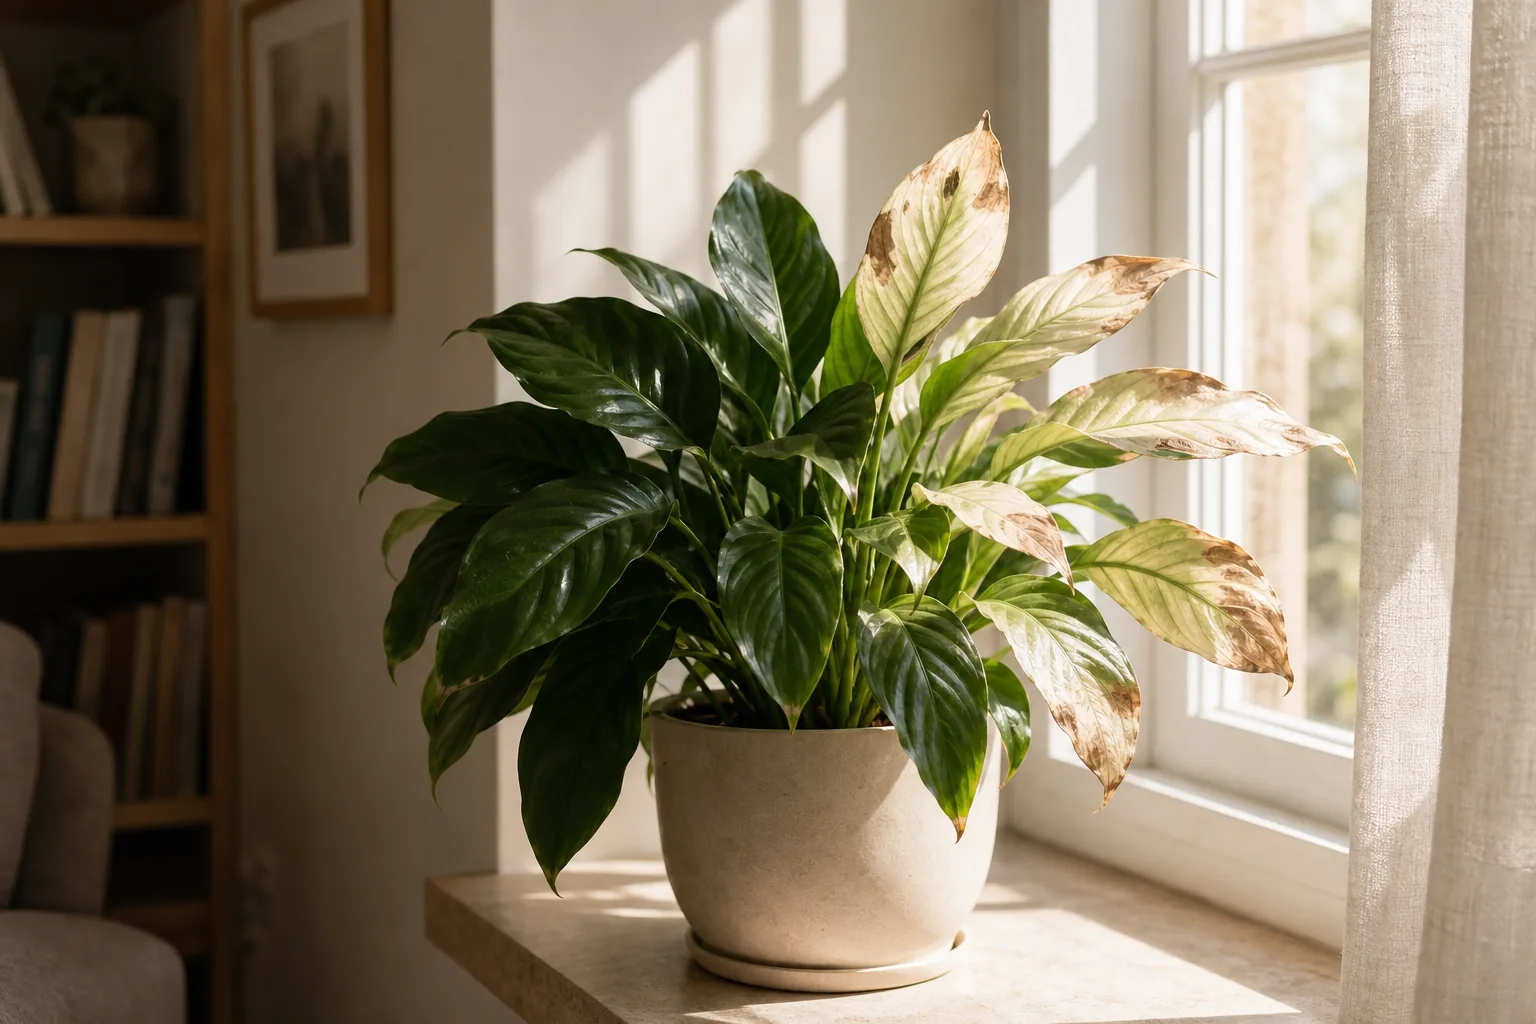
A houseplant that is getting more direct or intense light than its spot can sustain usually shows it on the leaves closest to the source — pale, bleached, or faded patches that turn brown and brittle. University of Maryland Extension describes the same pattern in plain language: “Strong sun and heat cause the breakdown of chlorophyll in the leaf. Damage appears as pale, bleached or faded areas. These areas eventually become brown and brittle.”
The reason to slow down is that bleached patches, faded color, crispy edges, and curling can all come from causes other than light. Treat “too much light” as one hypothesis among several, not the default. The single best clue is the pattern of where the damage sits on the plant. A plant reaching in the opposite direction — long, thin stems and small new leaves leaning toward the window — is more often asking for more light, and is covered in the leggy growth guide.
If you want to read the room before changing anything, the natural-light guide pairs well with the diagnostic steps below.
What to look at first: which leaves, which side of the plant
Before changing anything, walk around the plant and notice where the damage is concentrated. Three questions frame the observation.
Which leaves are affected? In a light-stress pattern, the most-exposed leaves — the top of the plant, the outer canopy, and the leaves facing the window or grow light — tend to show damage first. Lower, interior, or shaded leaves usually look fine.
Which side of the plant is affected? Damage that sits on one face, particularly the side closest to a window or fixture, points more strongly to light than to watering or humidity. Uniform damage across the whole plant usually points somewhere else.
What is the texture? Bleached light-stress patches feel dry and papery, not soft or mushy. They don’t usually have rings, halos, or wet-looking centers the way fungal or bacterial spots can.
This kind of pattern question is the same one university diagnostic guides use to separate abiotic (non-living) causes from biotic (pest or pathogen) ones. Nebraska Extension’s Common Signs and Symptoms of Unhealthy Plants notes that whole-plant symptoms are a different signal than localized ones, and Washington State University’s diagnostic tip sheet asks whether damage is “randomly distributed” or shows “distinct patterns.” Side-concentrated, top-heavy damage fits the distinct-pattern category.
The leaf patterns most often linked to too much light
These symptom clusters are the ones most consistently described in published guidance on excess indoor light. None of them on its own proves light is the cause; together with the pattern check above, they form a working hypothesis.
- Bleached or papery patches. The strongest visual signature. Pale, washed-out, or tan areas that feel dry and brittle, often on the upper surface of the most-lit leaves.
- Faded green or loss of color contrast. A general lightening of the leaf before any browning appears. Variegated plants may lose the contrast between green and the lighter or pink sections, though age, nutrients, and cultivar stability can also affect variegation.
- Crisping on the most-lit edges. Brown, crunchy margins on leaves facing the window, with cleaner edges on shaded leaves. Easy to confuse with underwatering or low humidity, so the pattern check above matters.
- Cupping or downward curling under midday sun. Often a reversible behavioral response rather than permanent damage. If the leaf returns to a flatter shape by evening or the next morning, that is a useful signal.
- Midday wilting that recovers. In practice, many growers see drooping during strong sun that improves as the light softens — commonly described as a heat-plus-light response rather than a watering failure, though extension sources do not treat it as a clean diagnostic rule on its own.
If the pattern mostly fits and the placement is a sunny window or a bright grow light, light stays on the list. If the pattern mostly doesn’t fit — damage on shaded leaves, across the whole plant, or with rings or halos — move on to the look-alike causes below.
What changes the answer: window direction, season, and recent moves
The same plant in the same pot can cross from “fine” to “overexposed” without you changing anything. Three variables are the usual reason.
Window direction. As a general rule of thumb in houseplant guidance, south- and west-facing windows tend to deliver the strongest direct light, east-facing windows give softer morning sun, and north-facing windows rarely produce light stress. A south window that worked in February can become a problem in May as the sun climbs higher.
Season and day length. As days lengthen in spring and summer, the same spot receives more total light and more intense midday rays. Damage that appears or worsens between March and August fits this story, and is one of the recurring themes in summer houseplant care.
Recent moves. A plant shifted closer to a window to compensate for short winter days — a common move in winter houseplant care — or moved out of a dim corner into a brighter spot, can show damage on leaves that grew under the old conditions. The opposite move — bringing an outdoors-in-shade plant onto a sunny sill — can produce the same result faster.
The sun-heated-glass variable is worth its own flag. UMD Extension notes that “symptoms are more severe when strong sun is combined with heat.” On a sunny windowsill, the pane itself can heat up, and leaves near or touching the glass receive extra heat along with the light. If you can feel warmth on the pane with your hand, the leaves nearest it are in the worst position.
How to confirm with a small placement change
Diagnosis becomes more confident when you can watch new growth respond. A calm sequence that respects both the plant and your observation window:
- Pick one variable to change. The most common first move is to add distance from the window — pulling the plant a short step back from the glass, shifting it to a side wall, or rotating it so the most-damaged side faces away from the source. Alternatives include hanging a sheer curtain or moving the plant a few feet into the room.
- Don’t change anything else at the same time. Don’t repot. Don’t change watering rhythm. Don’t fertilize. Don’t prune the damaged leaves yet. The point is to isolate one variable so the new growth tells you something specific.
- Wait through one new flush of leaves. A few weeks is usually enough to see new leaves come in clean if the placement change worked. Damaged leaves will not heal — bleached tissue is dead tissue and stays bleached or turns brown. The judgment is made on new growth, not on the old damage.
- Reassess the pattern. If new leaves come in clean and the side-concentrated damage stops progressing, the hypothesis is supported. If new leaves still show the same damage pattern, or damage keeps spreading, light may not be the driver.
Proportionate responses before you move the plant again
Once the diagnosis starts to firm up, keep the first response small.
- Add distance from the glass. Back the plant off the sill a short distance, or move it to a side wall that still gets bright indirect light.
- Filter with a sheer. A single layer of sheer curtain reduces intensity without turning the spot into shade.
- Shift the time-of-day exposure. A south- or west-facing window in the morning may be fine; the same window at midday is often the problem.
- Address hot glass. If the window gets hot to the touch, move the plant so leaves don’t rest against the pane. The placement piece on drafts, vents, and sun-heated glass walks through that overlap.
- Recheck in two to three weeks. If new growth is clean and the older damage isn’t spreading, leave the plant to recover. Damaged leaves can stay on for a while — they still photosynthesize to some degree — until you choose to prune for aesthetics.
If the damage continues after one placement change and a few weeks of new growth, the next step is to revisit the look-alike list rather than move the plant a second time.
Look-alike causes to rule out before you conclude
Several other common issues can produce damage that overlaps with light stress. The diagnostic habit is to rule these in or out using the same pattern logic — where the damage sits, and whether it is uniform.
Underwatering produces damage that’s uniform across the plant, with dry soil, a light pot, and drooping that doesn’t track the time of day. Brown tips from underwatering usually hit all leaves at similar rates, not just the lit side. A more complete walkthrough of these overlaps is in the brown tips and crispy edges guide.
Low humidity causes crisping concentrated on leaf tips and margins across the whole plant, often worse in winter when indoor air is dry — pointing to humidity rather than light.
Fertilizer or water-quality residue can leave salt buildup on leaf edges or soil surface after hard water or a heavy fertilizer dose. This produces brown margins with a different distribution than light-stress patches.
Pests often produce damage that doesn’t track the sun. Check the undersides of leaves and the stems for fine webbing, sticky residue, or small insects.
Fungal or bacterial leaf spots usually have defined margins, halos, or a wet-looking center. Spots like these are less likely to be light-related — the triage piece on spots on houseplant leaves is the next read if that’s what you’re seeing.
Natural aging of older leaves. The lowest, oldest leaves naturally yellow and drop as the plant pulls resources forward — a protective water-loss response described in Oregon State Extension’s diagnostic guidance. That’s normal and not a light signal. If you are sorting yellowing on more than just the oldest leaves, the broader houseplant leaves turning yellow checklist covers the multi-cause picture.
If the damage doesn’t fit any of these clearly, light becomes a weaker hypothesis rather than a stronger one — and the next move is to ask a local source.
When to stop adjusting and ask a local source
A single placement change and a few weeks of observation usually produce enough new growth to judge the answer. Stop adjusting and consult a local nursery, master gardener program, or your regional cooperative extension service when:
- New growth continues to show the same damage pattern after a placement change.
- Multiple plants in the same spot show similar symptoms at different severities, suggesting a placement factor that one small move hasn’t fixed.
- The damage has rings, halos, a wet look, or is spreading fast — signs worth a trained eye sooner rather than later.
- You’re unsure about identification of the plant itself. Light tolerance is species- and cultivar-specific, and “too much light” for a calathea looks different from “too much light” for a succulent.
A local source can identify the plant, look at the actual leaves and soil, and recommend a placement or care change that fits the room you have. The goal of the diagnostic above is to give you a confident working hypothesis before that conversation, not to replace it.
A quick reference for what to look at first
- Where on the plant? Most-exposed leaves, the top, and the window-facing side.
- What texture? Dry, papery, bleached — not soft, mushy, or ringed.
- When in the day? Midday sun; wilting that recovers by evening.
- What about watering? Soil moisture, pot weight, and a uniform pattern across the plant all argue against light as the main cause.
- What about the season? New or worsening damage between March and August fits the story.
- What’s the new growth telling you? Clean new leaves after a placement change is the best confirmation.
Light stress is one of the more fixable diagnoses in indoor growing, once you trust the pattern. Take one small step, watch the new growth, and adjust from there.
Sources
- Excess light on indoor plants — University of Maryland Extension
- Lighting for indoor plants — University of Maryland Extension
- Common signs and symptoms of unhealthy plants (EC1270) — University of Nebraska Extension
- A systematic approach to diagnosing plant damage — Oregon State University Extension
- Diagnosing plant problems — Washington State University Extension