Plant care
Heartleaf philodendron propagation: a calm walkthrough from vine to new plant
· Updated
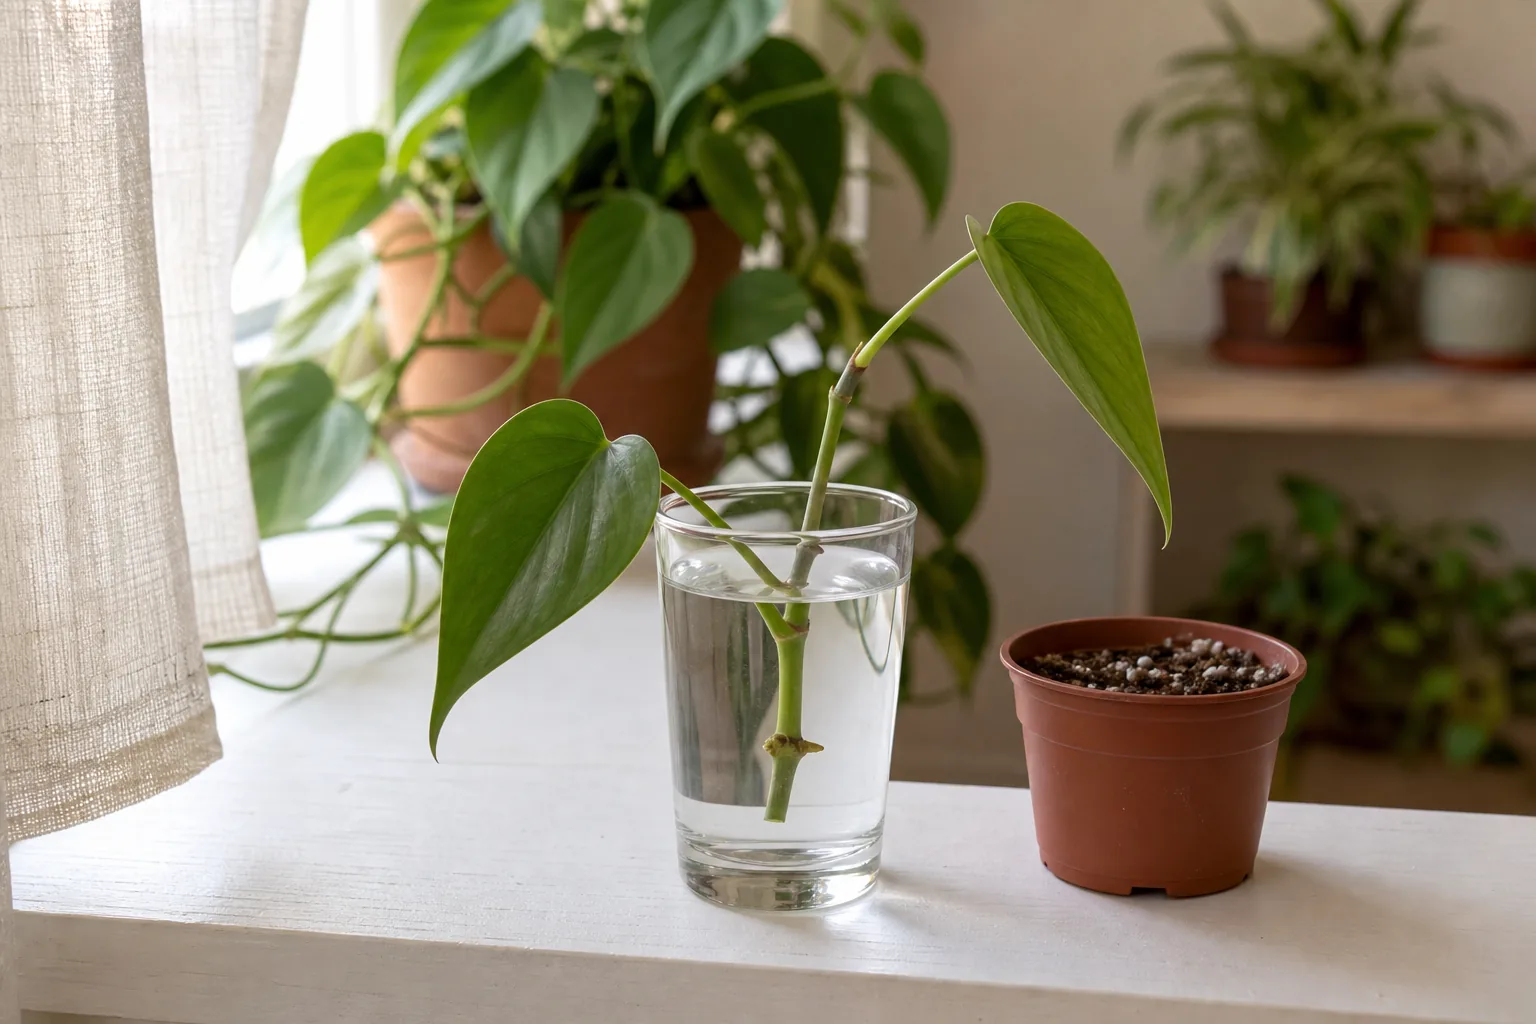
Yes — this is one of the easiest houseplants to turn into a new plant. Cut a 4 to 6 inch section of vine that contains at least one node, remove the leaf closest to the cut end, and set that node in clean water or a moist, airy medium. Within roughly 1 to 4 weeks at normal indoor temperatures, you should see pale, firm white roots emerging from the node. Once those roots reach about 1 to 2 inches and start to branch — usually around 3 to 6 weeks in — the cutting is ready for a small pot of light, well-drained mix. The whole thing usually works, and the part that decides success or failure is whether your piece of vine actually included a node.
What “heartleaf philodendron” actually means
Heartleaf philodendron is Philodendron hederaceum, a vining aroid grown for its trailing stems and small, heart-shaped leaves. The same plant has historically been sold under names such as P. cordatum or P. scandens, and you may still see those labels on older plants or in some nurseries, which can cause confusion at the shop.
Many of the most common trailing philodendrons sold as houseplants are this species or one of its cultivars, but a few lookalikes exist. When in doubt, check the label or ask the seller. For propagation, the species name matters less than the vine itself. Heartleaf philodendron has thin, flexible stems with one leaf and usually one aerial root nub at every node, which is exactly the anatomy you want for stem cuttings.
What you need before you cut
A few minutes of preparation prevents most of the usual problems. Propagation is also a reasonable way to refresh a long, leggy heartleaf vine without throwing the parent plant away — you take fresh cuttings from the bare section, root them, and replant.
- A clean, sharp cutting tool. Wipe scissors, pruners, or a knife with isopropyl alcohol. A ragged cut crushes the vascular tissue the cutting relies on for water uptake.
- A small jar, glass, or clear container for rooting.
- A spot that reads as well-lit to the eye but doesn’t take direct sun on the cutting or its jar. The plain-language walkthrough of how to read the natural light in your room is a useful sanity check if you’re not sure whether your spot counts.
- Optional: a small stake, twist tie, or piece of tape to keep a long cutting upright so the node stays submerged.
The parent plant should be healthy and ideally actively growing. Take cuttings in spring or summer if you can; they root faster in warm, bright conditions. The general conditions the parent plant and the new cutting should eventually live in are covered in the heartleaf philodendron care guide.
The one thing that decides success: the node
Every step below assumes your cutting has a node. The node is the point on the stem where a leaf stalk — the petiole — meets the vine. On heartleaf philodendron it usually looks like a slight thickening, a jointed segment, or a thin brownish ring, and it is almost always the same place where little aerial root nubs or wiry aerial roots already emerge.
The smooth, slightly lighter section of stem between two nodes is the internode. A cut made on a bare internode will not produce roots, because the tissue that initiates roots sits at the node, not between them. If you’re not sure where to cut, trace any leaf back down its petiole to where it joins the vine. That joint is your node.
Cutting length and what to leave on it
A single-node cutting with one leaf is the smallest piece that can become a new plant. It’s also the most fragile and slowest to establish. A two-node cutting with two leaves photosynthesizes more while it roots, sits more steadily in a jar, and tends to recover faster once potted — at the cost of more vine used from the parent plant.
For each cutting:
- Cut about a quarter to half inch below the bottom node with a clean tool.
- Cut roughly a quarter inch above the top node so the upper cut sits in dry air and the lower cut sits in water or medium.
- Remove the leaf attached to the lowest node. Submerged leaves rot fast, and a rotting leaf is the most common starting point for stem rot on a cutting.
- Leave any aerial roots attached. They won’t hurt the cutting, and they often become the first new roots.
Most usable cuttings end up 4 to 6 inches long with two to four leaves. Take more than you think you’ll need — heartleaf philodendron is generous, and a couple of cuttings in different jars hedge against one failing.
Rooting in water
Set the cutting in a clean glass so the bottom node sits under water and no leaves touch the water. Use room-temperature water; very cold water slows rooting a touch. Change the water every two to three days, or top up to keep the node submerged. Cloudy water is your first warning that bacteria are colonizing the cut end.
Healthy new roots are pale, white to tan, and firm. The first root usually emerges from one side of the node, then branches over the following weeks. Fine, slightly hairy white roots are normal. What is not normal: brown or dark roots that feel slimy, an empty or hollow feel when you pinch them, or a stem that turns brown or black at the waterline. Any of those mean rot, not just slow growth.
Rooting in a moist medium: sphagnum, perlite, or a light potting mix compared
Heartleaf philodendron roots readily in any of four common mediums. None is universally “best” — the trade-offs are worth weighing against the spot you have and the patience you have.
Water
Easiest to set up, easiest to watch develop, and the most common choice for a first propagation. The trade-off is that water roots are more delicate than soil roots and can struggle when transplanted into a dense potting mix. Some people add an intermediate step in sphagnum to bridge the gap.
Sphagnum moss
Long-fiber sphagnum soaked and then squeezed out until damp — not dripping — holds moisture around the node while staying airy. Many people mix it half-and-half with perlite, a hybrid sometimes called “dirty moss,” which adds airflow. Roots grown here tend to be slightly tougher than pure water roots.
Perlite on its own
Excellent airflow, very low rot risk. The trade-off is fast drying; the cutting wants a humid spot and a check every couple of days. Loose perlite also doesn’t anchor delicate new roots well, so handle the cutting gently if you move it.
A light potting mix directly
Skips the transplanting step entirely. A small container of light, well-drained mix works fine. The risk is that a soggy mix around a small cutting rots the stem. Keep the mix just barely moist, never soaking, until the cutting is established.
Pick whichever matches your conditions. If you want to see the roots and feel reassured, water is the easier setup. If your home is warm and dry, sphagnum or perlite is more forgiving. If you have a steady hand and a small pot ready, direct mix removes a step entirely.
Light, warmth, and humidity while roots form
Place the cutting in bright indirect light: well-lit to the eye, near but not in a sunny window, with no direct rays on the jar or container. Direct sun on a glass of water overheats the cutting, cooks aerial roots, and warms the water enough to grow algae. Deep shade slows rooting to a crawl.
Normal indoor temperatures — roughly 65 to 80°F as a general guideline — work well, and cuttings tend to slow noticeably below about 60°F. A loose clear cover over a sphagnum or perlite jar adds humidity if your home is dry, but leave an opening so air can move and the leaves don’t stay wet.
Reading the cutting: healthy progress versus rot
A heartleaf philodendron cutting tells you how it’s doing if you look. Check it at every water change.
Healthy signs:
- Firm, green stem and leaves.
- A small pale nub or short white root from the node within about one to three weeks.
- Branching or lengthening roots over the following weeks.
- A leaf that may soften slightly but stays green and recovers.
Warning signs:
- Stem turning black, brown, or squishy at the waterline or any cut.
- Roots that are brown, hollow, slimy, or smell sour.
- A leaf yellowing from the node upward, or developing dark wet patches.
When warning signs show, pull the cutting, cut the stem back to firm green tissue above the damage, let the new cut dry for an hour, and restart in fresh water or medium. Most salvageable cuttings recover this way.
When the cutting is ready to pot
Most heartleaf philodendron cuttings show their first roots in about one to four weeks and are ready to pot in roughly three to six weeks, depending on warmth and light. Rather than watching the calendar, look at the roots themselves: when the new roots are one to two inches long and starting to branch, the cutting has enough root mass to transition. Potting at the very first white nub is possible but leaves little margin for error; the cutting can dry out before its roots catch up.
If you started in sphagnum or perlite, the same rule applies. If you started in a potting mix directly, wait for fresh leaf growth as your signal that roots have established.
Potting up
Pot size
Move the rooted cutting into a small container — roughly 3 to 4 inches across is a common starting point — with drainage. An oversized pot holds more moisture than a small root system can use, and that excess moisture is the most common cause of loss after potting.
Mix
Use a light, airy mix that does not stay soggy. Standard indoor potting mixes work; mixes labeled for aroids or amended with perlite, orchid bark, or coco coir drain a little faster and tend to be a good fit. Keep the deeper discussion of potting mix choices to the mix selection guide, and look for the signs your potting mix has aged out if the parent plant’s mix is what you have on hand.
How to plant without breaking tender roots
- Moisten the mix ahead of time so it is damp, not soaking.
- Fill the small pot loosely; do not pack the mix down.
- Hold the cutting so the roots hang into the pot, then backfill gently around them and firm the mix just enough to hold the plant upright.
- Water once to settle the mix, then let the top inch dry out before watering again.
Avoid fertilizing for the first month. New water or moss roots are tender, and a strong dose of fertilizer can scorch them.
After-care for the new plant
Treat the new plant like a recently repotted plant rather than an established one. Bright indirect light, modest watering, and a few weeks without temperature swings or strong drafts. Our post-repotting guide covers the broader routine in detail, and the conditions the new plant should eventually live in are outlined in the heartleaf philodendron care guide.
A slight leaf droop or yellowing of the oldest leaf over the first week or two is normal as the cutting adjusts. After that, normal care resumes: water when the top inch of mix is dry, and let the long-term routine take over.
Common pitfalls and when to start over
A few recurring mistakes show up in most failed propagations:
- Cutting on the internode instead of the node. No roots will come, no matter how long you wait.
- Letting leaves sit under water. The leaf rots, then the rot travels into the stem.
- Forgetting to change the water. Cloudy water is the first sign that bacteria are colonizing the cut.
- Potting too early. Single short roots that aren’t yet branching have a hard time transitioning to soil.
- Potting in a too-large container. The mix stays wet, the small root system suffocates, and the cutting rots.
If a cutting has been sitting in clean water or damp medium for four to six weeks with no sign of a root and a soft brown stem, it is usually done. Take a fresh cutting from a healthier part of the vine, ideally one with an obvious aerial root nub, and start over.
A short note on safety and cultivar restrictions
Heartleaf philodendron contains calcium oxalate crystals. Chewed leaves and stems can cause oral irritation and discomfort in cats, dogs, and people. For most indoor readers this isn’t a day-to-day problem, but if you have curious pets or small children, keep cuttings and stray leaves out of reach. If a pet or a child chews any part of the plant, contact your veterinarian or a local poison control resource rather than treating at home. Our pet-aware houseplant choices piece frames the broader question of how to think about which plants fit a home with animals.
Also worth knowing: some variegated or branded cultivars — including selections marketed under trade names — are sold under plant patent or trademark restrictions that can limit how their cuttings are propagated or shared, especially if you intend to resell them. The plain green species is freely shareable with friends. For a specific cultivar, check the plant tag or the supplier’s terms before sharing commercially.
Sources
- How to propagate a philodendron: two ways — The Spruce
- Identifying nodes on a plant for pruning and propagation — Southside Plants
- Heartleaf philodendron propagation: water and soil guide — Greenerynest
- What does bright indirect light mean for houseplants? — GrowTropicals
- Easy Philodendron Brasil propagation tips — Joy Us Garden