Plant care
Air layering for houseplants: when to use it and how to do it
· Updated
What air layering actually is
Air layering is a propagation method where you grow new roots on a stem while it is still attached to the parent plant. Once those roots have formed, you cut the stem just below the new root mass and pot the top as its own plant. The parent is left with a shorter stem that usually pushes new growth from below the cut.
That last point is the reason indoor growers reach for it. A normal stem cutting in water or moss loses its connection to the parent’s roots while it tries to root on its own. An air layer never loses that connection, so the new top keeps getting water and nutrients from the parent while it builds its own root system. When you finally separate it, you are not potting a struggling cutting; you are potting a stem that already has a developed root system attached.
This makes air layering a higher-effort, more targeted option than other propagation paths. It is not faster in general, and it is not a universal upgrade. It is the right tool for specific situations.
When air layering makes sense (and when it does not)
Air layering earns its effort when three things are true at once: the stem is thick or woody enough that a normal cutting would struggle to root, you want to keep the leafy top of the plant rather than lose it, and the parent plant itself is healthy.
It makes the most sense for:
- A leggy rubber plant, fiddle leaf fig, or other Ficus where you want to shorten the parent without giving up the upper growth. Our rubber plant care guide and fiddle leaf fig care guide cover ongoing care for the parent once you have decided on a method.
- A mature Dieffenbachia, Dracaena, or schefflera with a long bare stem and a tuft of leaves at the top.
- Plants that have resisted rooting in water or moss after multiple attempts.
- Situations where you want a sizeable new plant right away rather than a small cutting that takes months to grow out.
It does not make sense for:
- Soft-stemmed trailing plants like pothos, philodendron heartleaf, and Tradescantia. These root easily from a node cutting in water or moss, and air layering is extra work for no real gain.
- Clumping plants like ZZ or snake plant. These are usually propagated by division, since there is no single woody stem to layer.
- A plant that is already unhealthy. Air layering does not fix root rot, severe pest pressure, or very poor light. The new layer will inherit the same conditions.
If the goal is just a fuller parent plant and the cut pieces can be propagated separately, a clean prune is often the simpler choice. You can read more about that approach in our guide to pruning a leggy houseplant for fuller regrowth.
Which houseplants respond well to air layering
University extension services and botanical gardens consistently recommend air layering for indoor plants with thick, woody, or mature stems. The list is short and worth trusting:
- Rubber plant (Ficus elastica) and other Ficus, including fiddle leaf fig.
- Dieffenbachia (dumbcane).
- Dracaena, including Dracaena marginata and Dracaena fragrans.
- Schefflera (umbrella plant).
- Aglaonema.
- Norfolk Island pine (Araucaria heterophylla).
- Spider plant (Chlorophytum comosum).
Horticultural society sources also include philodendron among plants that can be air layered, but for most philodendrons and similar aroids, a stem cutting in moss or water is faster and easier. Air layering for vining aroids is usually reserved for unusually thick or woody stems, not the typical trailing pothos in the corner.
One real boundary worth knowing: air layering generally does not work on monocots like palms and true grasses. Dracaena is a special case that several extension sources describe as a workable candidate, so the rule is not absolute, but it is worth keeping in mind before you try this on a parlor palm.
What you will need
The materials are simple and you likely have most of them:
- A clean, sharp, non-serrated knife or a pair of clean bypass pruners. Sharp matters more than sterile.
- Long-fiber sphagnum moss, enough to make a fist-sized ball when wet. Milled moss works but stays wetter against the stem.
- Plastic wrap, a small clear bag, or a strip of clear film to hold the moss against the wound. Twist ties or soft plant tape to secure it.
- Optional: a label-compliant rooting hormone. This is a “maybe,” not a must. If you use it, read the product label and follow it.
There is no need for alcohol sterilization, sealing wax, or specialty grafting tape. Clean tools and a careful cut are enough.
Choosing where on the stem to layer
Pick a spot on a healthy section of stem below the leafy crown, above any bare lower trunk where you would not want new roots to form. The best sites usually have visible nodes, small bumps, or even short aerial roots; these are places the plant is already primed to push root tissue. If you are not sure what a node looks like, our guide to finding the right place to take a cutting walks through the same anatomy on a smaller stem.
One note that often confuses new growers: the chunky aerial roots you see on Monsteras and some other aroids are not the same thing as the fine, pale roots that an air layer eventually produces. Aerial roots are part of the plant’s normal climbing structure and have been there since the plant grew them. Air-layering roots are a fresh response to a wound and a moist wrap. Our guide to aerial roots on Monstera and other aroids covers that distinction in more detail.
Avoid sections that are cracked, sunburned, recently wounded, or right at a leaf petiole. Leave at least a few inches of stem above and below the spot so the moss has room to sit and you have room to cut later.
Step-by-step: how to air layer a houseplant
Take your time. The whole procedure is closer to a careful kitchen task than surgery.
- Make a wound. About an inch below a node, make a shallow upward cut into the stem, deep enough to interrupt the outer stem layers and expose a glimpse of inner wood but not so deep that the stem itself is weakened. A second common option is to make two parallel cuts about an inch and a half apart around the stem and remove the narrow ring of phloem between them, leaving the inner wood exposed. Either approach works; the goal is to interrupt the flow through the outer stem layers rather than to cut the stem in half.
- Optionally apply rooting hormone. If you are using a product, follow the label and apply only to the exposed wound. Skip it if you would rather not introduce a chemical step. Many indoor air layers root without it.
- Prepare the moss. Soak a generous handful of long-fiber sphagnum moss in water, then squeeze it firmly until it feels like a wrung-out sponge. It should be damp, not dripping. The same moisture and airflow notes that apply to sphagnum moss propagation for cuttings apply here.
- Pack the moss around the wound. Press the damp moss against the wound so it makes full contact with the exposed surface and extends an inch or so above and below.
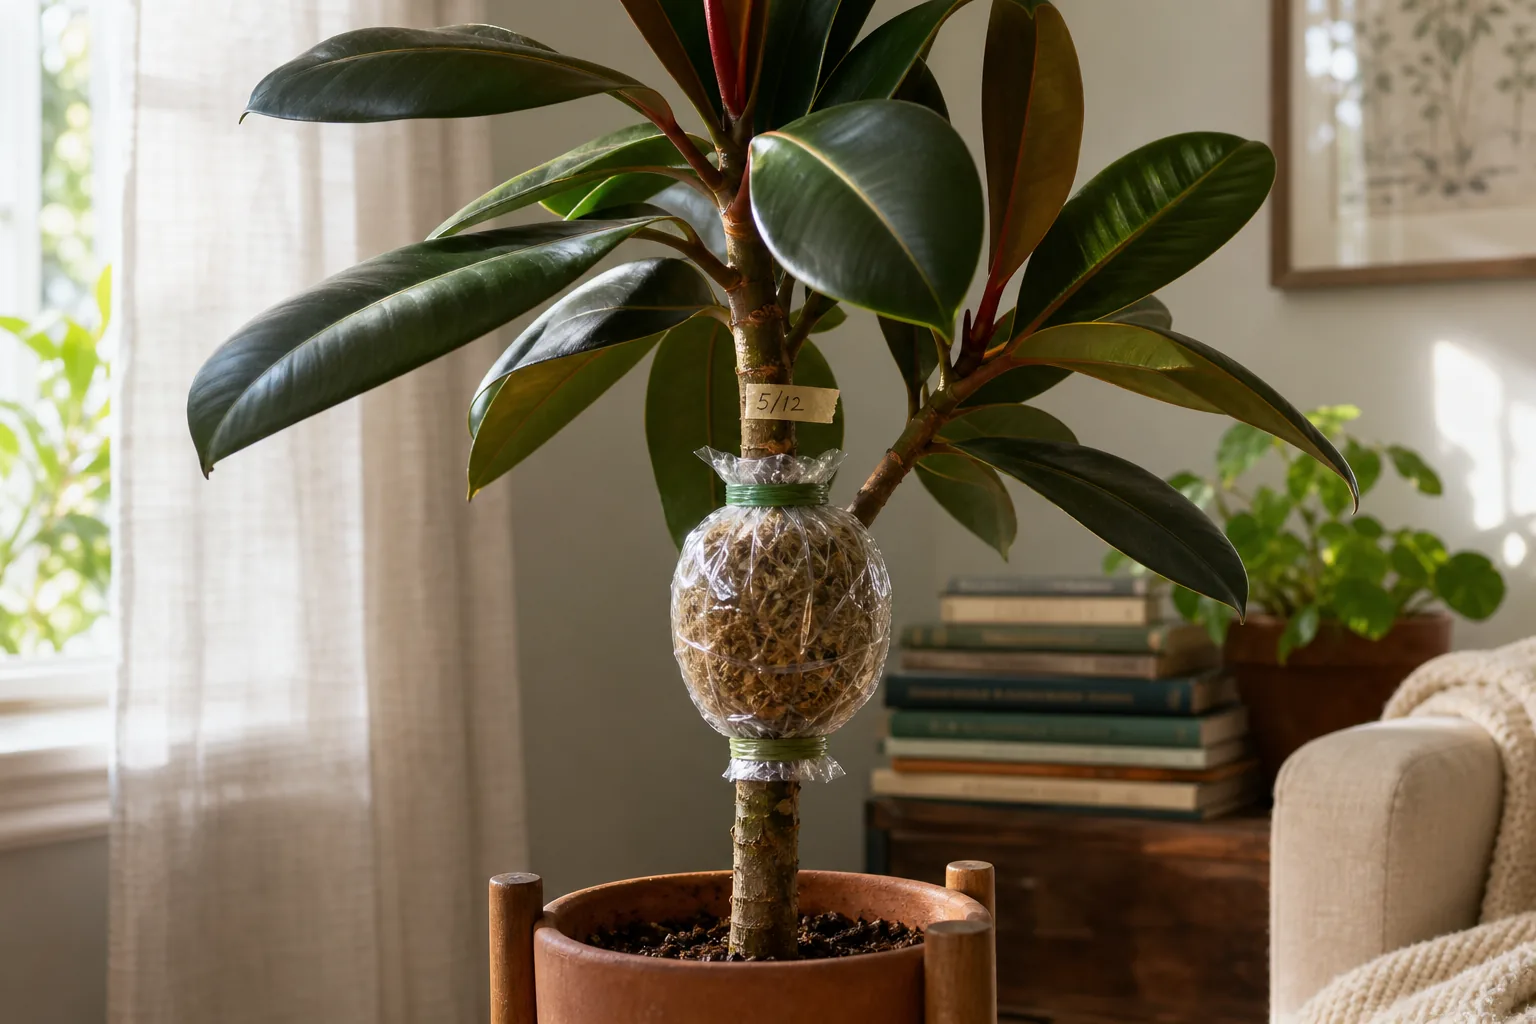
- Wrap to hold moisture. Cover the moss ball with plastic wrap, a small clear bag, or a strip of clear film. Secure both ends with twist ties or soft plant tape so the wrap stays snug but not strangling.
- Label and date it. A small piece of tape with the date helps you track the timeline without unwrapping.
How long it takes and what to look for
Realistic rooting time for indoor air layers is on the order of one to three months, with some plants taking longer depending on species, season, indoor light, and temperature. Texas A&M recommends spring layering on previous season’s shoots or mid-summer on mature current-season shoots as the most reliable windows, but indoor conditions are gentler and a healthy parent in a bright room can root outside those windows too.
The signs that roots are forming are visible without unwrapping:
- Pale or white roots pressing against the inside of the wrap, or the moss holding its shape better as roots bind it together.
- Continued healthy top growth on the parent plant. If the leaves above the layer are still turgid and pushing new ones, the stem is functioning normally.
- The wrap feels heavier than it did at the start, which means the moss is staying damp and the stem is taking up water.
What you should not do is unwrap repeatedly to peek. Every unwrap is a small disruption to the developing roots and a chance for the moss to dry out. If the wrap is still snug and there is some condensation inside, leave it alone.
Cutting and potting the new plant
Sever only after a developed root system is visible, not at the first sign of a single root. Missouri Botanical Garden is explicit on this point: a barely-rooted layer often fails when potted on its own.
When the root mass looks like a small, pale nest woven through the moss, cut the stem an inch or so below the new roots with your clean tool. Remove the wrap and most of the moss, and tease the roots gently apart without breaking them. Pot into a small container with a well-drained mix matched to the species, water just enough to settle the medium, and place the new plant in the same light the parent enjoyed. Hold off on fertilizer until you see active new growth.
For the first one to three weeks, the calm routine is similar to any newly potted plant: stable light, even moisture, no drafty windows. Our houseplant care after repotting guide walks through that window in more detail.
Aftercare for both plants
The parent plant now has a wound on its stem. In most cases it will callus over on its own and push new growth from below the cut, often from a dormant node. Keep the parent in its normal light and watering routine; there is no benefit to moving it to a shadier or more humid spot during recovery, and a sudden change can be its own stress.
The new plant needs patience more than attention. The root system it developed inside the moss is built for a humid, low-stress environment. As you move it into potting mix, expect a short adjustment period of slower growth or slight leaf droop. Active new leaves are the signal that the roots have transitioned.
If something looks wrong
Troubleshooting is mostly about reading the wrap and the stem:
- Moss that smells sour, looks black, or stays soggy for a long time. Unwrap, replace the moss with a fresh, wrung-out batch, and check the wound. If the wound itself is soft or black, the layer is unlikely to recover and you are better off waiting until the parent is actively growing again to try a new site.
- No visible roots after several months. Often this is a light or temperature issue, especially in a dim room during winter. Move the parent to its brightest window and wait for a more active growth period before deciding the layer has failed.
- Parent stem shriveling above the wound. The cut may be too deep or the parent may be under significant stress. This is the point to step back and ask whether the parent itself needs recovery work before any propagation.
- New plant wilting in its first pot. A short adjustment wilt is normal. Persistent wilting after a week, especially with moist soil, usually means the roots are not transitioning and the plant needs a calmer environment or a return to a propagation setup for a few more weeks.
If the situation is beyond what home observation can resolve, a local nursery, a master gardener program, or your state extension service can look at the actual plant and give specific advice.
Alternatives worth considering first
The honest case for air layering is that it is one of several tools, and the right tool depends on the plant and the goal.
- A clean prune is simpler when the goal is a fuller parent plant and the cut pieces can be propagated separately.
- A node cutting in water or moss is the right path for most soft-stemmed trailing plants.
- Sphagnum moss propagation is the right path for Hoya, Monstera, and similar aroids where you want a new plant from a stem section but do not need to keep the parent’s top.
- Division is the right path for clumping plants like ZZ and snake plant.
If after reading this you decide a different method fits your plant better, that is the correct outcome of the decision. Air layering is worth the extra effort only when the stem type and the goal line up.
Sources
- Iowa State University Extension: How to Propagate Houseplants by Air Layering and Simple Layering
- Virginia Tech Extension: Propagation by Cuttings, Layering and Division (426-002)
- Missouri Botanical Garden: Air-layering a Monocot Plant
- Texas A&M AgriLife Extension: Air Layering For Difficult-To-Root Plants
- University of Alaska Fairbanks Cooperative Extension: Airlayer to renew indoor plants