Plant care
How to transfer a water-rooted cutting to potting mix
· Updated
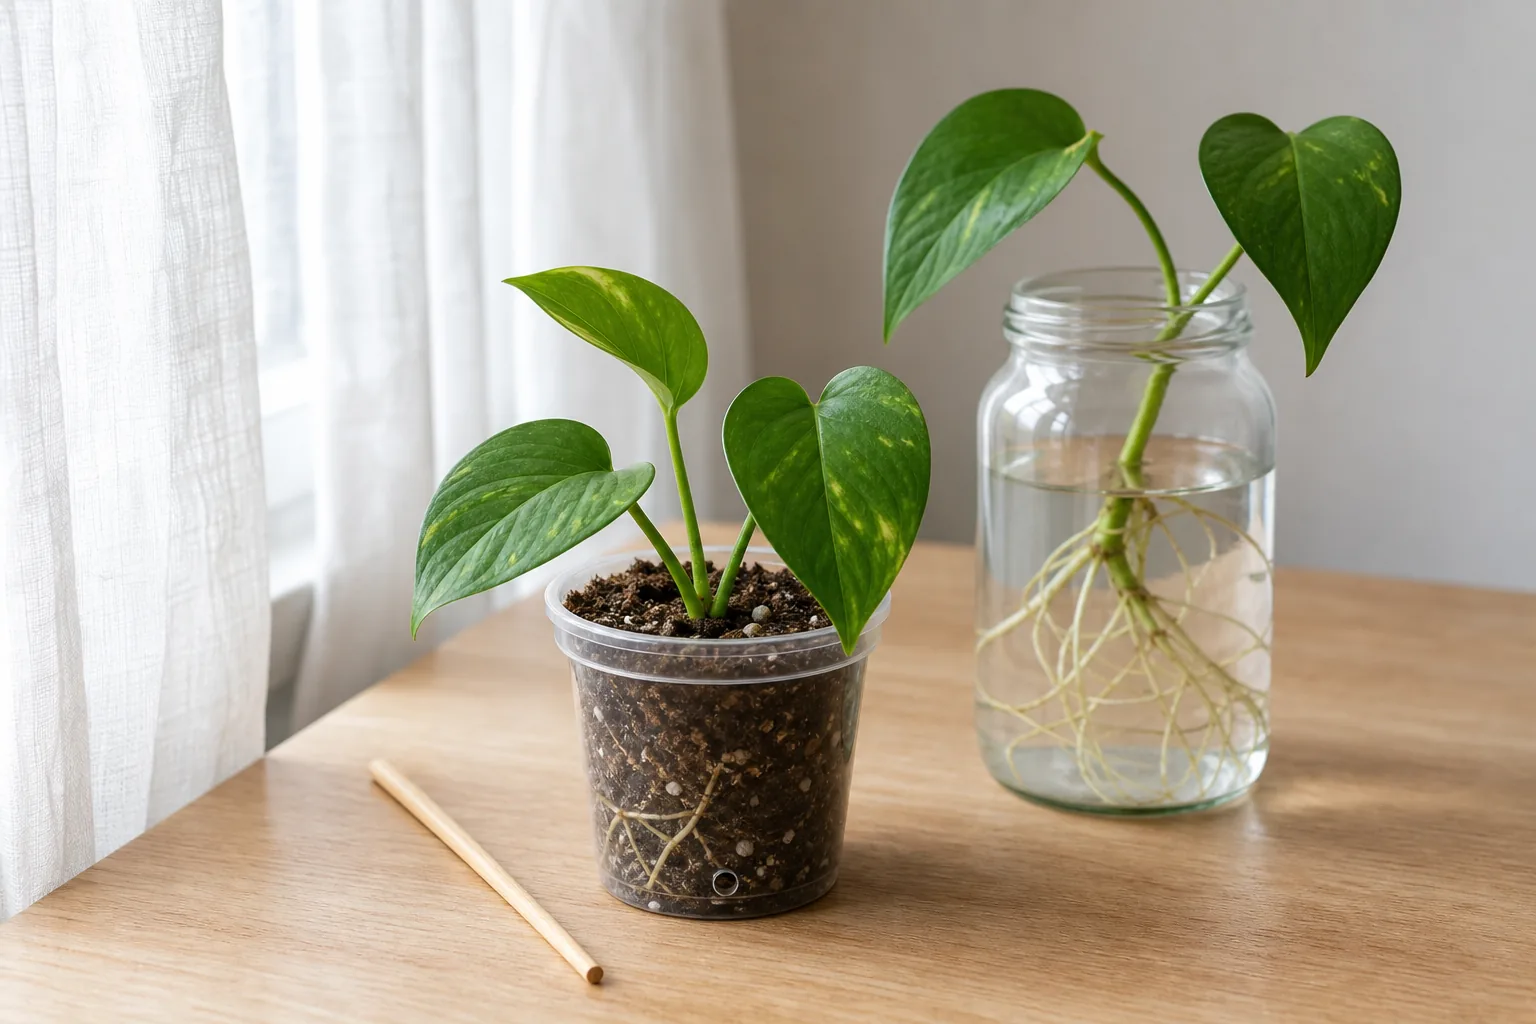
The short version: think of moving a water-rooted cutting into potting mix as a short acclimation rather than a one-time transplant. Pot one cutting per small nursery container with a drainage hole, in an airy peat- or coir-based mix amended with perlite or vermiculite. Set the stem at the same depth it sat in the jar, water through once so the medium settles around the roots, and let the pot drain freely. Keep the medium just barely damp for the next one to two weeks in bright, indirect light, with no fertilizer until new growth is visible. Use the cutting itself as your guide: mild leaf droop that firms up over a few days is normal adjustment, while a stem that turns black and soft at the old waterline is a rot signal.
Water propagation is a convenient way to watch roots form, but it is rarely where a tropical houseplant wants to live long-term. Most of the houseplants that root easily in a jar — pothos, heartleaf philodendron, monstera, tradescantia, peperomia, hoya — spend their lives in a well-drained soilless mix where oxygen reaches the roots. The transfer is the step that turns a cutting into a potted plant.
Where this step fits in indoor propagation
Three things have to happen for a cutting to become a stable potted plant: a node produces roots, those roots take up water and nutrients from a mix instead of a column of water, and the leaves resume new growth at the cutting tip. Water propagation handles the first item cleanly and the second only partially. The move into potting mix is what closes the gap.
Most of the work is observation. You are not presiding over a single decisive moment; you are shepherding a transition that the cutting will complete over one to two weeks. That framing is what changes a stressful step into a routine one.
How to tell the water roots are ready
Readiness is signaled by the roots, not by the calendar. A cutting that has been in water for a week can be more or less ready than a cutting that has been in water for a month; it depends on the species, the light, and the temperature of the room.
Across university extension and botanical-garden material, the practical cues are similar:
- Roots are white to off-white or light tan. Dark tan, brown, slimy, or papery roots are early decay signals; if that is what you see, the cutting is not ready to pot up.
- The cutting has produced several primary roots rather than a single thread, and you can see smaller side roots branching from them.
- The roots are long enough to handle without doubling the cutting back on itself — a couple of inches of branched root is a workable starting point, though there is no fixed minimum length that extension sources cite.
If the roots look dark, slimy, or papery in the jar, lift the cutting out, snip just above any discolored zone into firm green or white stem tissue, and put the cutting back in fresh water. Roots that are very small or absent are not a green light to pot up either; if you have already potted the cutting, firm the medium around the stem again and recheck in one to two weeks, as Purdue Extension recommends for cuttings that have not yet rooted in.
One popular claim worth reframing: water-grown roots are not a fundamentally different organ from mix-grown roots, and they do not categorically fail in a soilless medium. They tend to be finer and more brittle, and they have not been built to push through particles the way mix-grown roots are. The practical implication is that you keep the medium evenly damp while they adapt, rather than treating the move as a guaranteed loss.
Choosing a small pot and a workable mix
Size the pot to the root mass, not to the mature plant you hope the cutting will become. Missouri Botanical Garden’s propagation guide notes that once cuttings are rooted, they are typically moved into separate individual pots for further growth. A single cutting with a couple of inches of branched root is comfortable in a 2- to 4-inch nursery pot. SDSU Extension describes 6-inch containers as workable for several cuttings together and recommends a minimum depth of about 2 inches to support root development. A larger container holds more moisture than a small root system can absorb, which is a common reason a freshly transferred cutting goes soft at the base.
The pot needs a drainage hole. Standing water in the bottom of a sealed pot keeps oxygen away from the roots at exactly the stage when they need it most. A clear nursery pot slipped inside a decorative cachepot is a practical setup for the first two weeks: you can see moisture at the sides and watch the lower stem for darkening without disturbing the cutting.
For the medium, an airy peat- or coir-based houseplant mix amended with perlite or vermiculite is the safest default. Iowa State Extension lists peat moss, coir, bark, compost, soil, and vermiculite among the components that primarily hold water, with perlite named separately as the main aeration component. UMass and Penn State both describe propagation-friendly mixes built from those same ingredients, with perlite or vermiculite keeping the medium from compacting. If you want help comparing bags at a glance, the houseplant potting mix guide walks through the label-reading approach.
If you prefer a propagation-specific medium, Purdue Extension’s guide to cuttings suggests a 50/50 blend of vermiculite and perlite, with the caveat that any well-drained soilless potting mix will work. A standard houseplant mix is usually closer to what most readers have on hand and lets the cutting adjust to a typical indoor medium from the start, rather than to a transitional one.
Avoid garden soil. It compacts in a small pot, stays wet after watering, and does not match the airy texture that indoor propagation mixes are built to provide.
Planting the cutting without crushing or burying it
Pre-moisten the mix in a separate bowl so it is damp but not dripping. A handful squeezed hard should release only a few drops, not a stream. Damp mix clings to the roots instead of sliding off, which reduces handling damage.
Fill the small nursery pot partway, then make a planting hole with a finger, chopstick, or dibber — wide enough that the roots can drop in without being folded up. Lower the cutting in so the stem sits at the same depth it was at in the jar; any node that was above the waterline should still be above the mix surface. Burying a healthy stem deeper than it was before does not help rooting and can keep that section of stem wet enough to darken.
Backfill gently and firm the mix with your fingertips until the cutting stands upright on its own. Hard tamping crushes the fine water roots you just spent weeks growing. Stop firming the moment the cutting feels stable.
The first watering and the first two weeks
Water through the pot once at planting so the medium settles around the roots and any large air pockets collapse. Pour slowly, let the water run out the drainage hole, and do not let the pot sit in the runoff. This single soaking is the only time in the first week when you should be pouring with confidence.
After that, the medium should stay just barely damp — never soggy, never bone dry. The cleanest way to read this is by feel, not by a fixed schedule. The site’s watering-by-feel approach goes deeper into the daily check; the short version is to lift the pot and notice the change in weight, push a finger or chopstick an inch into the medium, and water again only when the top inch starts to feel dry. For most cuttings in most rooms that translates to somewhere between a few days and a week between waterings in the first two weeks. There is no universal number.
Place the cutting in bright, indirect light. Direct sun on a freshly potted cutting dries the medium around a small root system faster than the roots can keep up. A spot a step back from a sunny window, or a shelf near a window with a sheer curtain, is usually enough.
Skip fertilizer entirely until you see new growth — a fresh leaf unfurling, a clear extension of the stem, or a new side shoot pushing out. A soilless mix has limited native fertility, and salts from fertilizer on roots that are still adapting are a common cause of leaf-tip burn and stem damage. The first two weeks are about water and light, not nutrition.
During this window, the leaves are the main signal. Mild droop in the first day or two is normal adjustment; leaves usually firm up by the end of the first week as the roots begin pulling water from the new medium. A single leaf that yellows and drops while the rest of the cutting stays firm is often a single-leaf sacrifice rather than a system-wide failure.
The first two weeks after transferring a water-rooted cutting share most of their concerns with general after-repotting care — stable light, no fertilizer, careful watering — so the same observation-based routine described there applies to this moment as well.
What to do if the cutting wilts or drops leaves
Wilt and drop are not the same signal, and the stem tells you which one you are looking at.
A mild, general limp in the first three to five days that slowly firms up is the expected adjustment. The cutting is briefly out of balance while the roots shift from a fully aquatic environment to a damp, aerated one, and most easy-to-root houseplants come through it without intervention. Resist the urge to overwater to “help” — the medium is already damp, and adding more water is what tips the situation from adjustment into rot.
A stem that is turning black and soft at the old waterline — the line that was at the surface of the jar — is a different problem. That zone was the boundary between constant wet and constant air, and it is where opportunistic rot tends to start. Once the discoloration is dark and the tissue gives under gentle pressure, the cutting is unlikely to recover. A common recovery path is to lift the cutting out, cut just above the highest discolored section into firm pale tissue, and put the healthy top back into fresh water to re-root. Treat the original pot’s mix as spent, especially if a musty smell has developed, and clean or replace the container before reusing it.
A stem that stays firm but loses a leaf or two in the first two weeks is usually a single-leaf event, not a sign that the whole cutting is failing. New growth from the tip or a side node is the stronger signal that the transition is taking.
Some cuttings simply do not make the transfer, even when the steps above are followed. Species, root quality at potting time, light, and the medium in the pot all influence the outcome, and that variation is real. Treat a single loss as data, not as a verdict on your technique, and start a fresh cutting from the mother plant if you want another try.
Sources
- Purdue Extension — New plants from cuttings (HO-37-W)
- Iowa State University Extension — Potting media: components and handling
- Penn State Extension — Potting media and plant propagation
- Missouri Botanical Garden — Propagating plants by cuttings