Plant care
How to prune indoor houseplants
· Updated
Prune a houseplant when you can name a reason, cut just above a node or side shoot with a clean sharp blade, take no more than about a third of the foliage in a single session, and treat the next two to four weeks as observation rather than recovery. That is the whole method in one sentence. The rest of this article is the conditions, the trade-offs, and the practical next steps for each kind of indoor plant.
What pruning actually is for an indoor plant
Pruning is a deliberate cut into living or dead tissue, made with a tool you can name, at a point you can point to, for a reason you can say out loud. Inside a home that is the entire definition that matters. Indoor pruning is not a seasonal ritual, a styling project, or a way to force a plant to do something it was never going to do. It is a small, targeted interruption of the plant’s current pattern of growth.
When you remove a growing tip, the plant loses the dominance of that tip. Lateral buds lower on the stem often activate, which is what readers mean when they say pruning “makes a plant bushier.” The mechanism is observable rather than magical: the plant redirects energy to other points it already had, and the visible result depends on which buds were there to begin with. That is also why response varies by species, by light, and by the season your home happens to be in. It is honest to say that some plants will branch from a cut and some will not, and the rest of this hub is about telling the difference before you start.
When a houseplant actually needs pruning (and when it does not)
You have a real reason to cut when you can point to one of the following:
- Dead, dry, or mushy tissue that the plant is no longer using.
- Damaged or bent stems that are not going to recover on their own.
- A bare middle on a vining plant, where leaves have dropped and the stem is just rope.
- A node where you want a new branch and the stem above it is shading out the rest of the plant.
- An overgrown plant that has crossed a line in your room and needs to come back from that line.
You probably do not have a real reason when you are pruning because the plant looks “messy” in a vague way, when you read that a plant should be cut back in spring and your plant is doing fine, or when you want to take cuttings and are framing it as pruning to feel safer. There is nothing wrong with propagation, but it is a separate decision, and the post you are reading is about the cut itself.
A good test: can you name what the cut is supposed to change, and can you describe how you will know in two to four weeks whether it changed? If yes, the cut is probably reasonable. If the answer to both is vague, the plant is probably telling you to wait.
Tools: what to use and how to keep them clean between plants
For most indoor work you need two tools, not five. A pair of sharp bypass pruners or snips handles stems up to about the thickness of a pencil. A pair of small, sharp scissors handles soft new growth and tip pinching. Anything larger than that is for outdoor plants and is more likely to crush a thin indoor stem than to help.
Tool hygiene matters indoors because you are working in a closed room where any sap, moisture, or pest you carry from one plant can end up on the leaves of the next. Wipe the blades with isopropyl alcohol on a clean cloth before you start, between plants, and after you finish. The same wipe-down routine that goes on cleaning leaves and tool hygiene between plants covers this in more detail.
If you have just cut into tissue that looked diseased, disinfect the blades before moving on. If a plant has pests, treat the pest problem before you prune, so you are not spreading the infestation along with the cut.
Where to cut: nodes, leaf joints, and the parts beginners miss
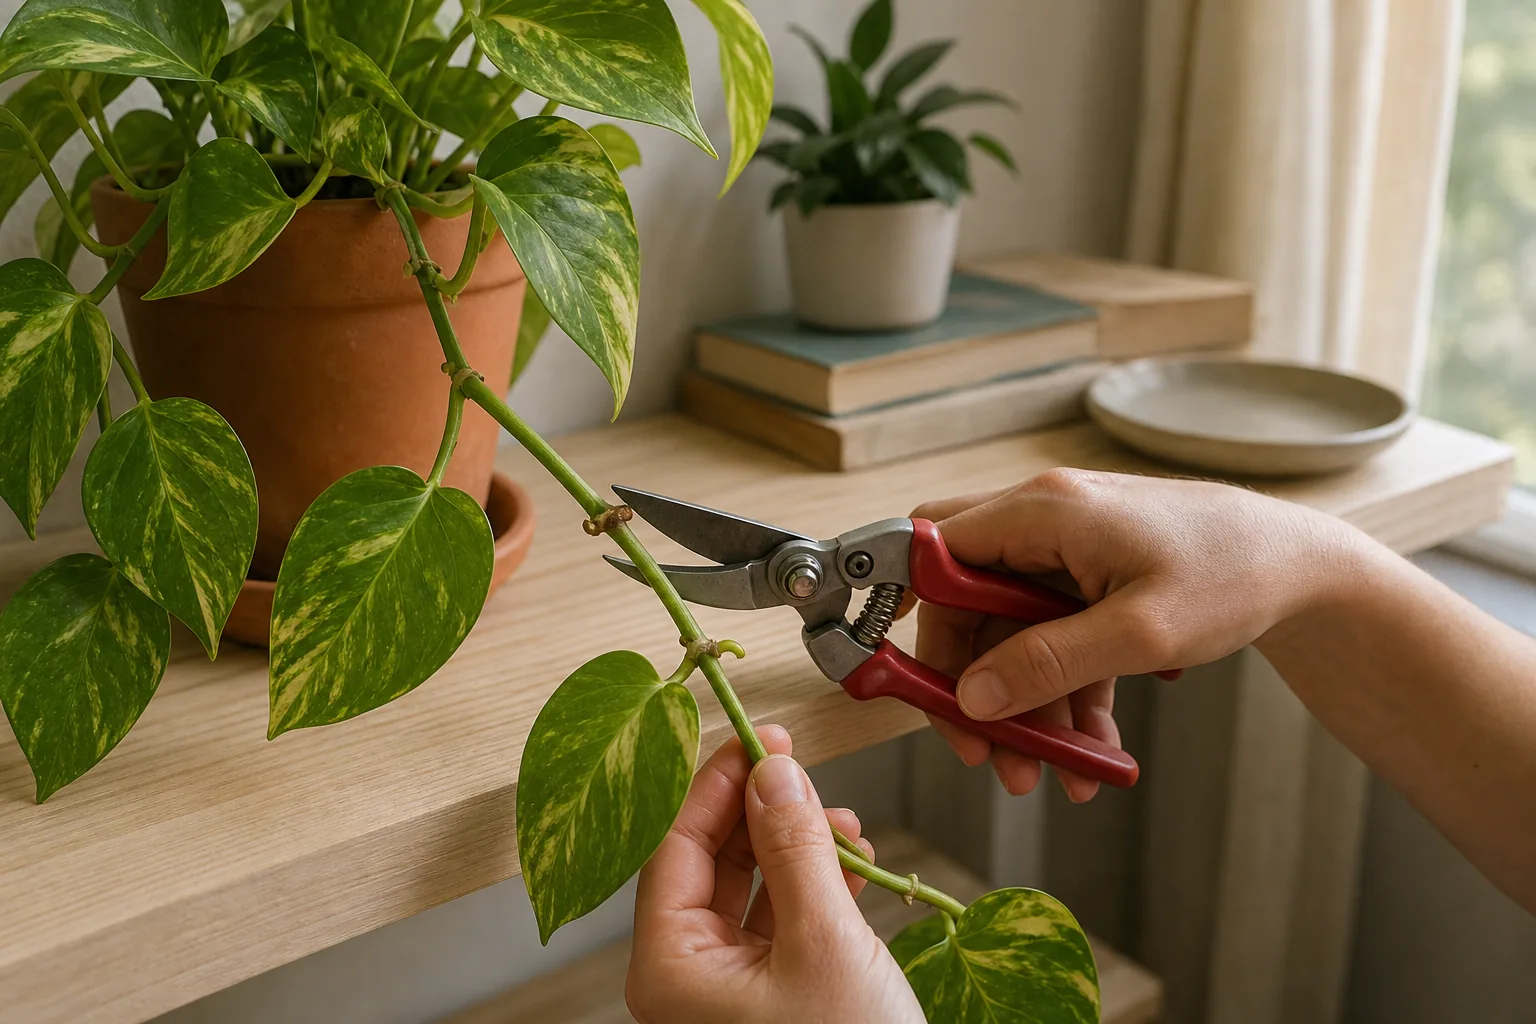
A node is the point on a stem where a leaf, an aerial root nub, or a side shoot attaches. The space between two nodes is the internode. On a pothos vine you can feel the node as a slightly thicker joint where the leaf stem meets the vine, often with a small brown nub on the opposite side that wants to be an aerial root. On a Monstera deliciosa the node is the ring where the petiole wraps the stem, often with a visible aerial root already growing from it.
Place your cut just above a node, on the side you are removing, with the cutting blade closest to the part of the plant you are keeping. That is the standard instruction from botanical garden guidance for indoor pruning. A clean, slightly angled cut is fine; the angle matters less indoors than outdoors because there is no rain to shed, but a clean cut from a sharp blade matters a lot because crushed tissue heals slowly.
What beginners most often miss is the node itself. They cut halfway down an internode and leave a stub that dries back, or they cut just below a node and leave the dormant bud on the piece they removed. Both are survivable mistakes, but they leave an uglier plant and a slower response.
Pruning by growth habit: vining, upright, succulent, and rosette plants
The same cut instruction lands differently on different plants, which is why species lists run out of usefulness quickly. Growth habit is the better organizing principle.
Vining plants (pothos, philodendron, Monstera, hoya, ivy)
These are the most forgiving pruning category. Lateral buds sit at every node, so a cut just above a node reliably sends new growth from the bud below the cut. Tip pinching, removing just the soft growing tip with your fingers or scissors, encourages a fuller shape on a young vine and is the lowest-risk pruning action indoors. For a vine that has gone bare in the middle, the common partner move to cutting is training the bare stem onto a moss pole or trellis, covered in supporting climbing and vining houseplants, because new leaves tend to come from the top, not the middle.
Upright and woody-stemmed tropicals (Ficus, Schefflera, Dracaena, some philodendrons with thick stems)
These tolerate pruning back to a side shoot or a node, but the response is slower and less predictable than on vines. A Ficus lyrata cut just above a node may push one or two new leaves from that bud, or it may push new growth from a bud further down the trunk. Some Dracaena respond by sending out a new shoot near the top, not at the cut. Set the expectation honestly: a single cut on an upright tropical is a months-long experiment, not a quick fix.
Succulents with stems (jade plant, Echeveria stretched into a rosette on a stem, kalanchoe)
For most stem succulents, the unit of removal is often a whole leaf or a whole offset rather than a stem cut. A stem cut on a succulent can work, but callus and root response are slower than on leafy tropicals, and the cut surface should be allowed to dry and callus before the soil gets wet. If the stem is etiolated because the plant is not getting enough light, the right first move is almost always a light move, not a cut. The same logic is explained in why a plant stretches toward the window.
Rosette-formers and columnar succulents (snake plant, aloe, Echeveria in tight rosettes, many columnar cacti)
These often do not branch from a stem cut at all. Snake plant leaves can be removed at the base, and the plant may produce offsets from the rhizome, but cutting the top off a columnar cactus or a single-stem aloe typically does not produce a forked plant. If the goal is propagation, separate offsets or leaves are the right unit of removal. If the goal is shape, the honest answer is usually that this category is not a pruning-friendly category.
How much to take off in one session
A widely shared rule of thumb is to remove no more than about a third of the foliage in a single pruning session, with one-quarter as the safer end of that range. That limit is not a hard extension mandate for indoor plants, but the spirit of it is consistent across horticulture: a plant needs enough leaf area to keep photosynthesizing through its recovery, and indoor light is usually the limiting factor.
If you are not sure how much to take, take less. You can always cut again in a few weeks. You cannot put a stem back.
What to do with the pieces you cut off
Decide before you cut whether the pieces are going in the trash, the compost, or a glass of water on the windowsill. This article is not about propagation, but a quick honest note: cuttings from healthy indoor plants often root, and they sometimes do not, and the species, the node, the time of year, and the light in your home are all in play. If you want to try rooting what you cut off, treat it as a separate experiment with its own expectations.
If the cut pieces are diseased, bag them and put them in the trash. Do not compost material that looks infected.
The two to four weeks after pruning
The weeks after a cut follow the same observation pattern as what to expect after a deliberate disturbance to the plant: a pause on inputs, watchful waiting, and patience while the plant uses its stored energy. Treat the weeks after a cut as an observation window, not a recovery checklist, and a reasonable routine looks like this:
- Keep the plant in the same light it has been growing in. There is no benefit to moving it to a brighter or shadier spot as a “recovery” measure.
- A common practice is to pause fertilizing for a few weeks. The plant is using stored energy for new growth, and adding fertilizer does not speed that up.
- Water on the same schedule you were already using, leaning slightly toward the drier side if the plant has fewer leaves than before.
- Watch for new growth at the node below the cut on vines, for new shoots near the top on upright tropicals, and for offsets at the base on succulents. Anything else is the plant’s business.
If you see wilting, blackening at the cut, or a general slump that does not match the change in light or water, the cut may have been too much, or there may be a separate problem the cut did not cause.
Common pruning mistakes indoors
- Sealing cuts with pruning paint, wax, cinnamon, or honey. Extension research has shown that sealants and home remedies trap moisture and slow the plant’s own wound response. Leave clean cuts alone.
- Cutting into the middle of an internode and leaving a stub that dies back anyway.
- Removing more than a third of the foliage on a plant that is already in low light.
- Pruning a plant that is actively wilting, dropping leaves from a different cause, or recovering from a recent move or repot.
- Pruning because it is the calendar’s idea of spring, instead of the plant’s.
When to leave the plant alone and revisit later
You do not have to prune at all. A houseplant that is full, healthy, and roughly the size you want it to be does not need a cut just because it is a houseplant. The strongest reason to put the pruners down is the absence of a reason to pick them up.
If you do decide to cut, work in one session, on one plant, with one goal. The next session can come in a month or two, after you have watched what the plant actually did.
Sources
- Missouri Botanical Garden, Renovating an Indoor House Plant: https://www.missouribotanicalgarden.org/gardens-gardening/your-garden/help-for-the-home-gardener/advice-tips-resources/visual-guides/renovating-an-indoor-house-plant
- New England Botanic Garden at Tower Hill, How to Prune and Propagate Vining Houseplants: https://nebg.org/2020/03/25/prune-propagate-vining-houseplants/
- University of Maryland Extension, Selecting Indoor Plants: https://extension.umd.edu/resource/selecting-indoor-plants
- Washington State University Puyallup, The Myth of Wound Dressings: https://wpcdn.web.wsu.edu/wp-puyallup/uploads/sites/403/2015/03/wound-sealer.pdf
- Brooklyn Botanic Garden, Pruning Plants That Ascend: https://www.bbg.org/article/pruning_plants_that_ascend