Plant care
How to propagate tradescantia so the new pot looks full
· Updated
Take a 3 to 5 inch stem cutting just below a node, strip the leaves off the bottom inch, and root it either in a small jar of room-temperature water or directly in a moist, well-drained potting mix. Plant 4 to 6 rooted cuttings together in one container sized to the root mass, place the pot in bright indirect light, water by feel rather than on a schedule, and pinch the growing tips once the plant is actively growing to encourage branching. Tradescantia is one of the easiest houseplants to root, and that fuller-looking new pot is the result of two deliberate steps (planting several cuttings together and pinching the tips), not a single trick.
Why tradescantia is one of the easiest houseplants to propagate
Tradescantia (sold under common names like inch plant, wandering dude, and the older wandering jew) sends out roots from the same joints on the stem where its leaves attach. Those joints are called nodes, and they are pre-loaded with the cells that become new roots and side shoots. Once you understand where to look for a node, the rest of the process becomes a matter of giving the cutting clean water, clean air, and a little patience.
The vining types you are most likely to have, including Tradescantia zebrina, T. fluminensis, and T. pallida (purple heart), all root from stem cuttings using the same method. The rosette form, T. spathacea (sometimes sold as Rhoeo or Moses-in-the-cradle), grows more like a small bromeliad and is usually multiplied by dividing offsets at the base rather than from a long vine. This guide is aimed at the vining types where cutting and replanting is the everyday move.
Read the mother plant before you cut
Most readers end up here because their tradescantia has gone leggy, sparse at the base, or simply too long for its pot. If that is your situation, the underlying cause is usually light, and the same plant will keep stretching in the same spot. Our guide on why a houseplant gets leggy walks through that in more detail, but the short version is that long gaps between leaves and thin, weak stems are the plant asking for more bright indirect light.
Pick a parent stem that is healthy, vigorous, and green. Younger, actively growing stems root faster than old, woody ones at the base of the plant. Avoid any stem with visible pests, sticky residue, soft spots, or yellowing leaves, since problems on the mother plant usually show up on the cuttings too. You want enough length to spare 3 to 5 inches without leaving an awkward bare stub. If the plant is long enough, taking several cuttings at once is better than one, because you will want to plant them together later.
Find the node and take a clean cutting
A node is the small bump or joint on the stem where a leaf attaches. On tradescantia it is often visible as a slight thickening or a faint line. Roots form at the node, not from a random spot on the stem, so the cut matters.
Use clean, sharp scissors or snips. A crushed or torn stem is slower to root and more likely to rot. Make the cut just below a node, so the bottom of the cutting ends at the joint where roots will form. Strip the leaves off the bottom inch so no leaf will sit in water or be buried in mix (leaves trapped under either will rot quickly). A reliable cutting is 3 to 5 inches long with at least two nodes: one at the bottom to root, and one or two upper nodes to push new top growth once potted.
Two reliable rooting methods: water and direct-to-mix
Both methods work for tradescantia. Pick the one that matches how you like to watch a project progress.
Water rooting
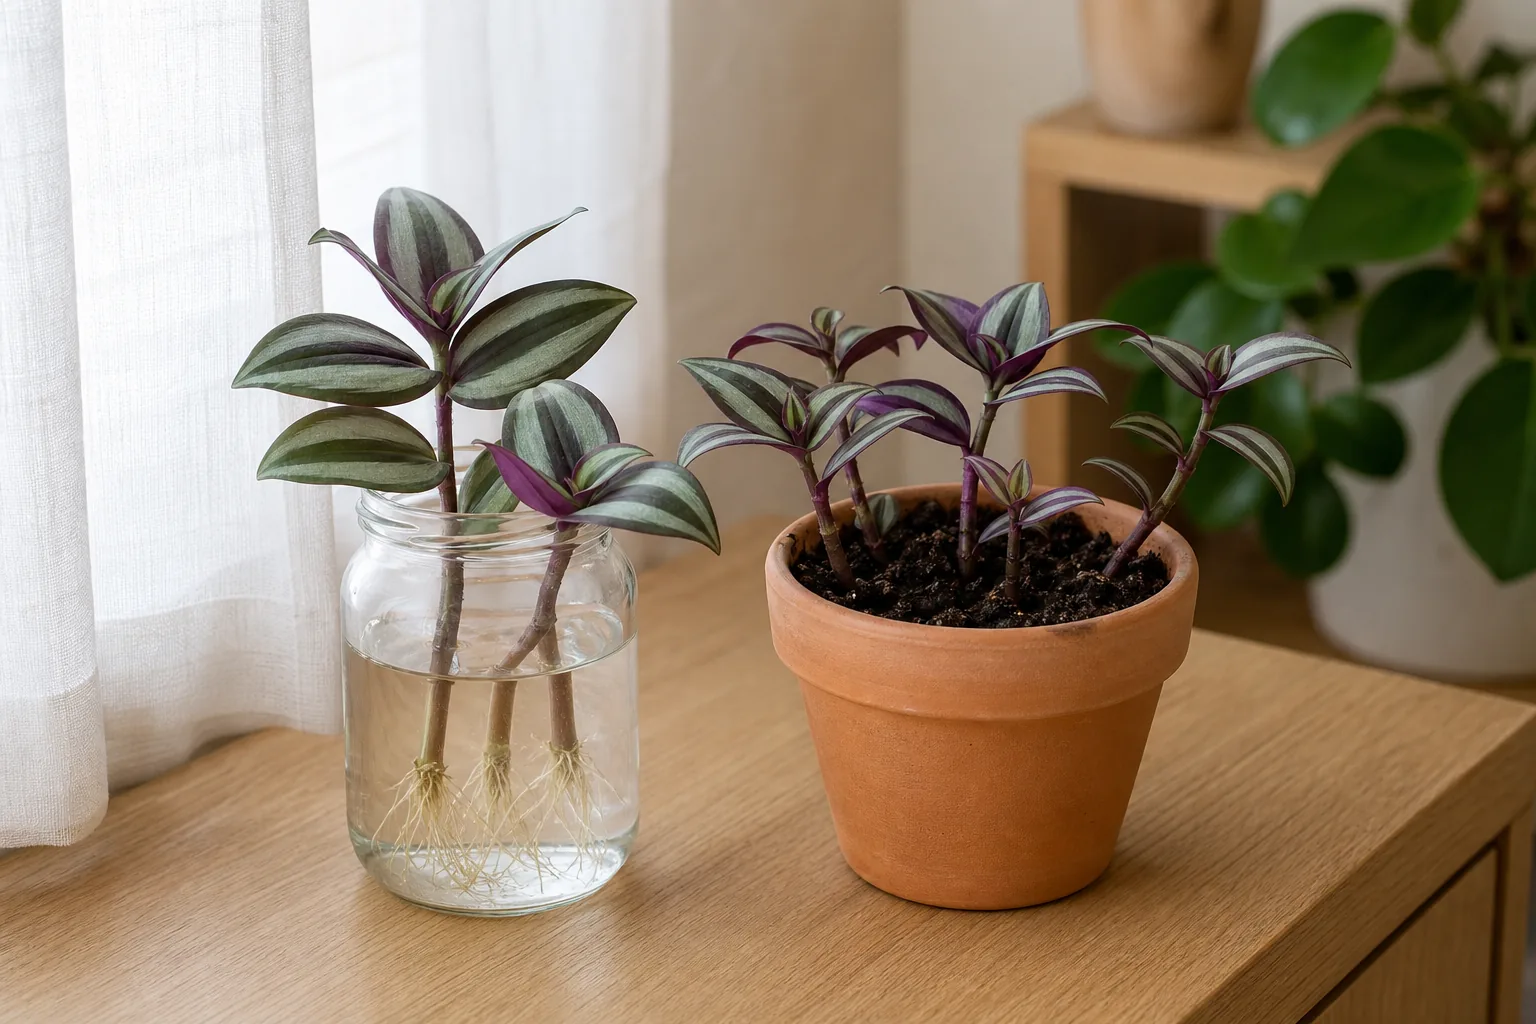
Place each cutting in a small glass jar with the bottom node submerged in room-temperature water and the upper leaves above the rim. A jar with a narrow neck helps hold the cutting upright, but any clean glass will do. Change the water every 3 to 5 days, or whenever it looks cloudy, because stale water slows rooting and invites rot. Keep the jar in bright indirect light, not on a hot sunny sill where the water can heat up.
The advantage is that you can watch the roots form. The trade-off is a small transplant step later, because roots grown in water need a brief adjustment when they move into soil.
Direct-to-mix rooting
Insert the cutting into a moist, well-drained potting mix so at least one node is buried and at least one node remains above the surface. An ordinary indoor potting mix amended with perlite is the most commonly used recipe, and our guide on choosing a well-drained potting mix walks through how to read a bag label rather than rely on a brand. The container should have drainage holes.
The advantage is that the cutting never has to switch from water to soil, and you can stick several cuttings straight into the pot where they will live. The trade-off is that you cannot see the roots, and a mix that stays too wet will rot the buried stem before roots can form. If your mix feels soggy an hour after watering, it is the wrong mix for this job.
How long roots take and what healthy roots look like
Most tradescantia cuttings show small white root nubs within about a week and reach a pot-ready length of one to two inches within roughly 1 to 3 weeks. That range is honest because it depends on the conditions you can actually observe.
Faster rooting tends to come from a warm room, fresh water, bright indirect light, and a young green parent stem. Slower rooting tends to come from a cool room, stale water, very low light, and older woody stems. If a cutting has not rooted after 3 to 4 weeks in clean water at normal room temperature, the most likely cause is that the stem was old or weak. Take a fresh cutting from a younger, greener part of the mother plant rather than waiting longer.
Healthy new roots are white or cream and firm. Root nubs (small white bumps before full roots) are normal and not a sign of rot. A mushy, brown, or slimy stem, or roots that fall apart when touched, are rot. If you see that, discard the rotted cutting and take a fresh one from a healthy, younger portion of the mother plant. Treating the water with anything is not the answer; replacing the cutting is.
Potting up rooted cuttings without shocking them
Once water-rooted cuttings have roots about 1 to 2 inches long, pot them up. Choose a container that is sized to the root mass, not oversized. A small pot, just a few inches across for a cluster of 4 to 6 cuttings, holds the right amount of moisture. A pot that is too big stays wet for too long and invites the same rot you just avoided during rooting.
Use the same well-drained mix you would use for direct rooting. Water once after potting so the mix settles around the roots, then let the top of the mix dry slightly before watering again. Expect the cutting to look a little droopy or quiet for the first week or two as it adjusts; that is normal and not a sign that something is wrong. Our post on what to do after repotting a houseplant covers this adjustment arc in more detail.
Plant several cuttings together for a full-looking pot
A single cutting in a wide pot looks lonely for weeks, because one stem cannot cover a wide surface. The fuller-looking pot comes from a deliberate choice: plant 4 to 6 rooted cuttings together in the same container, spaced evenly across the surface.
Cluster the cuttings so their roots spread in different directions rather than crowding into one spot. Bury each stem about an inch deep so the lowest node sits just under the mix and the cutting stands on its own. After a few weeks of active growth, the stems will fill the gaps between them, and the pot will read as a full plant rather than a handful of separate sticks.
First month of aftercare: light, water, and the first pinch
Light
Bright indirect light is the right condition for a freshly potted tradescantia. Direct sun on a small pot or a glass jar heats up fast and can cook the cutting or dry the mix, which slows rooting. A spot near a window with a sheer curtain, or a few feet back from a brighter window, usually works well.
Water
Water by feel rather than a calendar. Stick a finger into the top inch of the mix; if it feels dry, water thoroughly until a little runs out the drainage holes, and if it still feels cool or damp, wait another day. Our guide on watering by feel instead of a schedule walks through that observation habit.
The first pinch
Once the cuttings are established and pushing out clear new growth, usually after one or two new leaf pairs have appeared, pinch off the very tip of each stem just above a leaf pair. This sounds harsh but it is what tells the plant to send out two side shoots where there was one, which is the entire reason the pot starts to look full. Pinch too early and you stall the cutting; pinch once new growth is visible and the plant responds quickly.
Hold off on fertilizer until the plant is actively producing new growth. Fertilizing an unrooted or freshly potted cutting can burn forming roots and set the plant back rather than help it.
Common problems and what they actually mean
A mushy stem in water or mix is rot, almost always from stale water or a mix that stays too wet. Replace the cutting.
A cutting that never roots is usually from an old, woody stem, or from a cutting kept in very low light or cold conditions. Try again with a younger green stem in a warmer, brighter spot.
Lower leaves yellowing on a new cutting is normal at first, because the cutting redirects energy to root production. If only the bottom leaves yellow and the top of the cutting looks firm, leave it alone.
Sudden collapse of a previously healthy cutting usually means rot caught up with it overnight. Take a fresh cutting from a healthy portion of the mother plant rather than trying to rescue the collapsed one.
A note on pets
Tradescantia’s effect on cats and dogs varies by species and by the individual animal, and a reliable species-specific answer is best confirmed with the ASPCA and your veterinarian rather than any single article. For a broader look at choosing houseplants with pets in mind, our pet-aware houseplant choices post is a calmer place to start than any one species claim.
Sources
- University of Wisconsin Horticulture Extension: Tradescantia zebrina, Zebra Plant
- University of Pennsylvania Graduate Student Center: Propagating plants from cuttings
- Healthy Houseplants: Trailing tradescantia plant care guide
- Happy Houseplants: How to propagate tradescantia (wandering dude) in 3 easy steps
- Exploring Tradescantias: Reasons your tradescantia propagations aren’t making it