Plant care
Spider plant babies: a calm guide to rooting and potting plantlets
· Updated
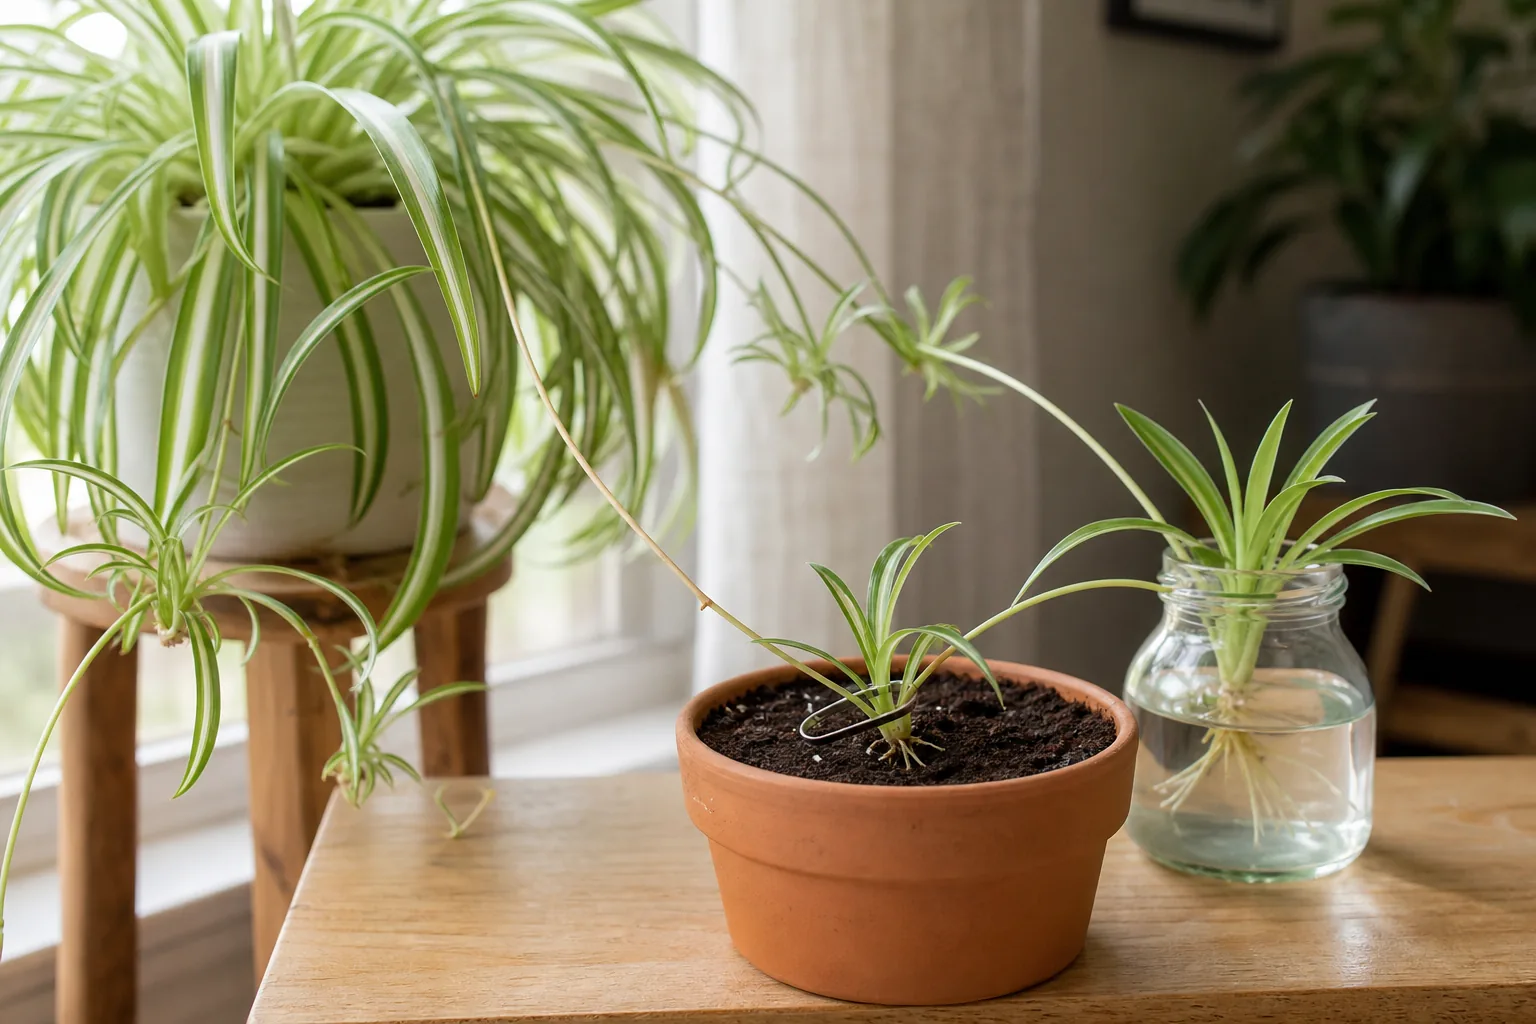
The small plantlets forming on long arching stems from a spider plant are not flowers. They are tiny vegetative offsets — sometimes called pups, spiderettes, or babies — that a mature mother plant produces as a natural way to spread. When a plantlet has a few small leaves of its own and pale, white root nubs at its base, it is ready to start life on its own. You have three reasonable paths: root it while it is still attached in a small pot of mix set beside the mother, cut it free and root it in a small jar of water, or cut it free and pot it directly into a small starter pot. Pick the path that fits your patience and your space.
For a refresher on the mother plant’s care — light, watering rhythm, and pot conditions — see the spider plant care hub. The rest of this article assumes the mother plant is healthy and producing plantlets; if she is not, that is the first thing to fix.
What a spider plant plantlet actually is
Spider plant (Chlorophytum comosum) reproduces vegetatively indoors. The long, arching stems you see are inflorescences — flower stalks — that may carry small white flowers and, more importantly, develop miniature plantlets at their nodes and tips. Each plantlet is a clone of the mother plant with its own crown of leaves and the beginnings of a root system. Wisconsin Horticulture at the University of Wisconsin describes the spider plant as a foliage species that produces offsets on these arching stalks in standard indoor culture.
Because plantlets are vegetative copies, they will grow into the same species and cultivar as the mother. You do not need seed, special equipment, or rooting hormone. The plantlet has done most of the preparation already; your job is to give it a place to root and keep it from drying out or rotting while it does.
How to read when a plantlet is ready
Two visible cues tell you a plantlet is mature enough to root.
- Leaf development. The plantlet has a small rosette of leaves that are starting to open and lengthen rather than sitting tightly folded at the tip of the runner. A commonly observed threshold in home propagation is leaves roughly 2 inches (5 cm) long, but treat that as a useful observation rather than a hard rule. Smaller plantlets can still root, just more slowly.
- Root nubs at the base. Look at the underside of the plantlet where it meets the runner. You should see small pale bumps — root primordia, sometimes already showing as short white tips. These are the beginnings of the root system. If the nubs are not yet visible, give the plantlet more time on the mother plant; the mother is still feeding it.
If you cannot see nubs and the plantlet looks like a tightly closed tuft of leaves, it is too early. If the plantlet has visibly long white or brown roots hanging in the air, it is past ready — that is fine, it just needs to be potted soon.
Path 1: root the plantlet while it is still attached
This method is a form of layering, which extension services describe as a standard way to propagate offset-type plants. The mother plant keeps supplying water and energy to the plantlet while its new roots form in a separate pot, so the plantlet is never truly on its own until it has a working root system.
To do it:
- Set a small pot of pre-moistened, light, well-drained potting mix beside the mother plant. The pot should be only slightly larger than the plantlet’s eventual root mass — a 3- to 4-inch pot is a typical home choice for one plantlet, not a rule.
- Bring the runner over so the base of the plantlet sits flat on the surface of the mix, with the pale nubs in contact with the soil.
- Pin the plantlet down lightly so it does not spring back up. A small piece of bent wire, a hairpin, or a stone on the runner works.
- Keep the mix lightly moist — not soggy — and wait.
Within a few weeks, the plantlet should have roots of its own. You will feel gentle resistance if you give the plantlet a very slight tug. At that point, snip the runner an inch or so from the plantlet and let it live in its new pot. The mother plant is undisturbed.
The tradeoff: attached rooting asks for patience and for a stable spot where two pots can sit close together for a few weeks. In exchange, it has the lowest risk of rot or transplant shock, because the plantlet is never severed from its water supply until it has roots.
Path 2: cut the plantlet free and root it on its own
If you want to relocate the plantlet, give it away, or simply rearrange the mother plant, cut the runner about an inch below the base of the plantlet with clean scissors. Once cut, the plantlet has only the water you give it, so the next step matters.
You have two reasonable options: water rooting or direct-potting. Both are described in extension and botanical-garden literature as valid propagation paths for offset-type cuttings. The choice is about what you can observe easily and how much transplanting you want to do later.
Water rooting
Water rooting is appealing because you can see the roots as they form. Use a small, clear vessel — a glass jar, a propagation vase, even a clean yogurt cup — and fill it with room-temperature water. Set the plantlet on top so the base hovers just above or barely touches the water. You want the nubs wet, not the leaves submerged.
Refresh the water on a regular cadence — every few days to about once a week is a reasonable rhythm — and any time it looks cloudy or slimy. Cloudy water is a sign that microbial build-up is starting, and that is what leads to rot. Keep the vessel in bright, indirect light at stable room temperature. Michigan State University Extension notes that a common rooting temperature target for cuttings is roughly 73 to 77 °F (about 23 to 25 °C), and that temperature is one of the main levers you can adjust indoors.
Roots usually appear within a couple of weeks, but the exact timing depends on light, temperature, and how mature the plantlet was when you cut it. Some plantlets take longer. Some stall; that is normal information, not personal failure.
Direct-potting
Direct-potting skips the water step. Fill a small starter pot with a light, well-drained, soil-less potting mix — Missouri Botanical Garden notes that cuttings generally develop a sturdier root system in a soil-less mix than in water, and that perlite or sand can be added to improve drainage. Press the base of the plantlet into the surface so the nubs are in firm contact with the mix, and water gently to settle it in. For guidance on matching a bag of mix to a small starter pot, see choosing a light, well-drained starter mix.
Keep the mix lightly and evenly moist, never soaking. A clear plastic bag or cloche over the pot can hold humidity around the leaves while roots form, but open it for a few minutes every day or two so the air does not go stale.
The tradeoff: direct-potting hides the roots, so you cannot watch progress, but it skips one transplant and produces roots that are already adapted to soil. Water rooting shows you everything and gives you a satisfying visible cue, but it adds a transplant step later.
Moving a water-rooted plantlet into soil
When the water roots have a little length to them — often an inch or more — and you can see fine side roots starting to branch, the plantlet is ready to move. Do this gently. Water roots are more brittle than soil roots and can snap if you rush.
- Prepare a small starter pot with the same light, well-drained mix you would have used for direct-potting. Choose a pot only slightly larger than the root mass; see when to size up from the starter pot if you are unsure how small to start.
- Water the mix so it is evenly moist but not soggy.
- Make a small hole with your finger or a pencil.
- Lower the plantlet in, taking care not to fold or crush the white roots.
- Press the mix gently around the roots and water once more to settle it.
For the next week or two, treat the pot like a newly repotted plant: bright, indirect light, lightly moist mix, and no fertilizer yet. What to do after repotting a houseplant covers this adjustment period in more detail.
First weeks of independent life
Once a plantlet is in its own pot — whether by direct-potting or by transplant from water — the next few weeks are a quiet observation period, not a troubleshooting emergency. The plantlet has a small root system in a small volume of mix, so the margin between “lightly moist” and “soggy” is narrow.
Keep the plantlet in bright, indirect light at stable room temperature. Avoid drafty windowsills in winter and hot, sunny spots in summer; both extremes stress small roots. Water when the top of the mix begins to feel dry, and learn to read soil moisture before watering rather than watering on a calendar.
Do not fertilize yet. The standard cue across propagation guidance is to wait until you see clearly new leaves emerging on their own — that is the sign that the root system is functional and taking up nutrients. Feeding before then risks burning tender new roots.
If the plantlet has been direct-potted or moved out of attached rooting, it is normal for the oldest leaves to yellow or wilt slightly as the plant redirects energy into new roots. New growth from the center of the rosette is the sign that things are working.
At some point — usually weeks to a few months later — the plantlet will start to fill its starter pot. When watering behavior shifts, roots peek from the drainage holes, or the mix dries unusually fast, see when to size up from the starter pot for what to look for before moving the plantlet up a size.
What can go wrong
A few outcomes are common and ordinary, not signs that you did something wrong.
- Rot at the base. The plantlet’s base turns brown or black and feels soft, and the leaves flop. This is usually from over-wet conditions — water rooting with stagnant water, or a mix that stayed soggy. Trim back to firm tissue, refresh or replace the rooting medium, and start over with another plantlet. FAO guidance notes that propagation media should be refreshed or replaced at the first sign of unexpected rotting.
- Stalled rooting. Weeks go by and nothing visible happens. The usual culprits are too little light, a too-cool windowsill, or a plantlet that was cut too early. Move it to brighter, warmer conditions if you can, or set it back on the mother plant to recover.
- Wilting after transplant. A plantlet moved from water into mix often droops for a few days as its roots adjust. Keep humidity a little higher — a loose plastic bag over the pot helps — and resist the urge to overwater.
A plantlet that has clearly rotted is unlikely to recover. The honest move is to start over with another one and adjust one variable at a time.
When to step back and ask a local source
If several plantlets have failed in similar conditions, the cause may be the mother plant’s environment rather than your technique. A local independent nursery, a county extension office, or a botanical garden can often look at a sample and suggest adjustments specific to your water, light, and home. The houseplant care disclaimer at Houseplant Supplies is a good reminder that no article, including this one, can replace seeing your specific plant in its specific room.
Sources
- Spider plant, Chlorophytum comosum — Wisconsin Horticulture, University of Wisconsin–Madison Extension
- Propagation (Chapter 13, Extension Gardener Handbook) — NC State Extension
- Propagating plants by cuttings — Missouri Botanical Garden
- Managing temperature during propagation — Michigan State University Extension
- Propagating conditions — Food and Agriculture Organization of the United Nations