Plant care
How to divide a ZZ plant by separating its rhizomes
· Updated
How to divide a ZZ plant by separating its rhizomes
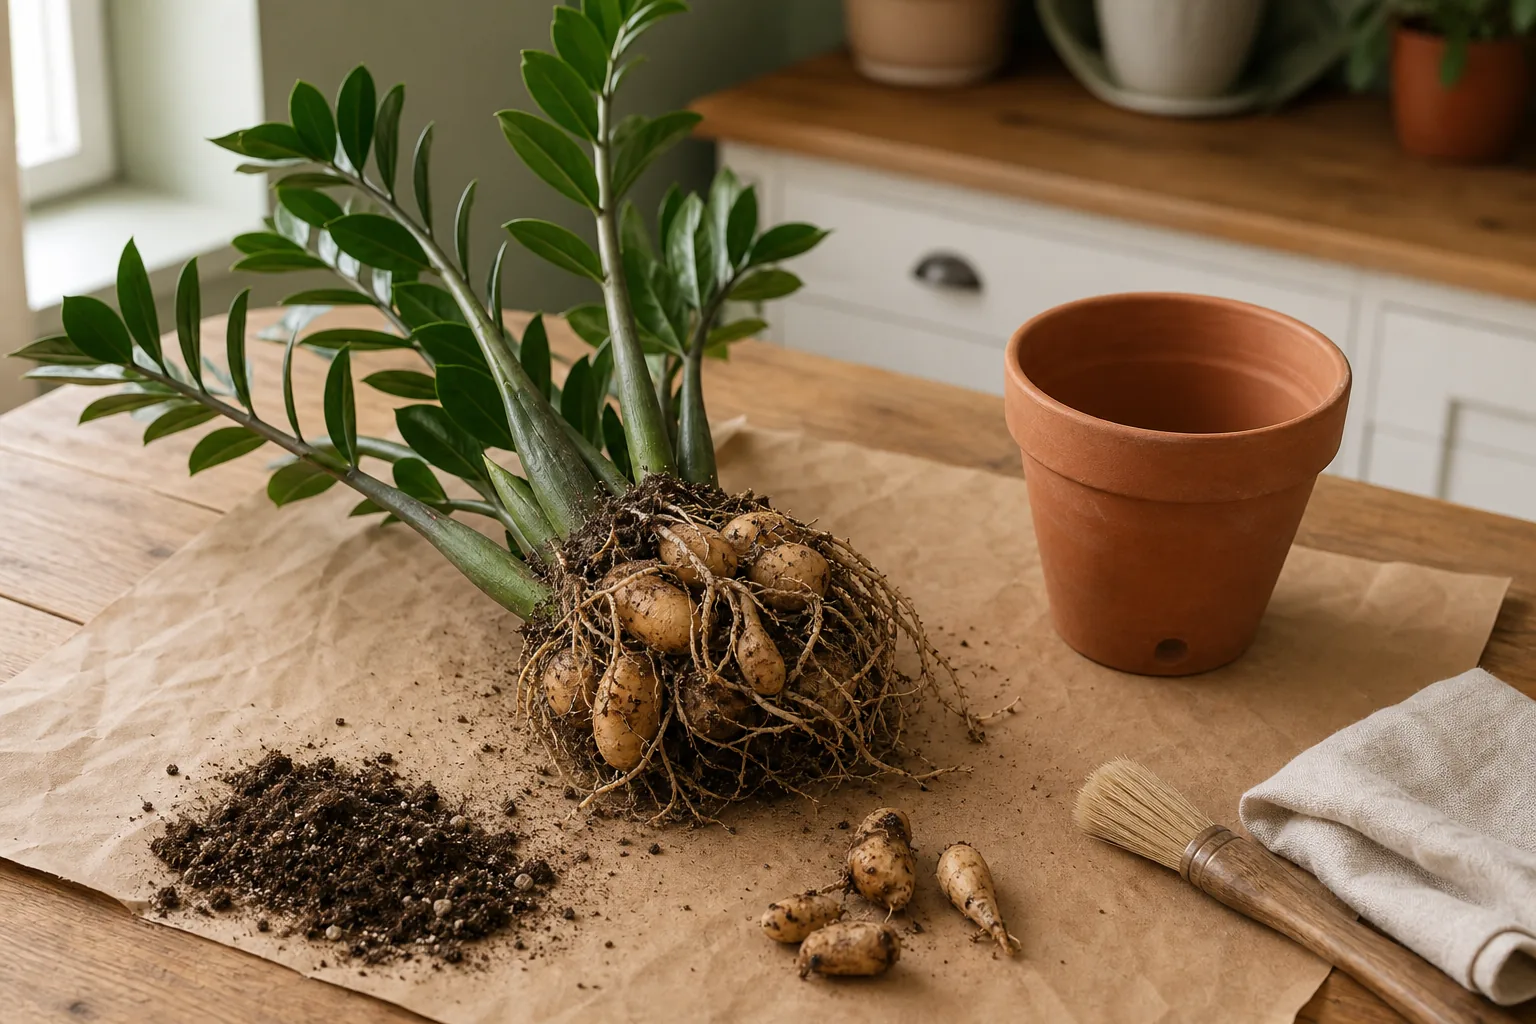
A ZZ plant (Zamioculcas zamiifolia) can be divided, but only when the plant has multiple distinct rhizome clusters with their own stems. Slide the whole plant out, brush or rinse the root ball so the natural seams between rhizomes are visible, and only cut if the rhizomes do not separate by hand. Pot each division into a snug, well-drained container with a dry, airy mix, hold off on watering for several days, and expect the plant to look static for weeks before resuming growth.
This article focuses on division by rhizome separation. For the species-level care rhythm that division should slot into, see the existing ZZ plant care guide. For the broader question of when any houseplant should be split versus up-potted, the general houseplant division guide is the better starting point.
Why ZZ division is different from most houseplant division
Most houseplants store energy in a fibrous root ball that pulls apart with some gentle hand work. A ZZ stores water in potato-like rhizomes that sit at or just below the soil surface, sometimes partially exposed. Those rhizomes are the plant’s reserve tank, and they are also the part most easily damaged or rotted. Division works only when those rhizomes can be separated as discrete clumps. The general principles of division still apply, but the mechanical task looks different because the storage organs are not roots at all. They are modified stems.
First, decide whether division is actually what your ZZ needs
A crowded pot and a division-ready plant are not the same thing. Before reaching for a blade, check the symptoms against the when to repot a houseplant guide and the guide to signs a houseplant is root bound. If the only problem is that the plant has run out of room in its current container, the simpler answer is usually to move up one pot size and refresh the mix. Division is the right call when you want multiple plants, when the rhizome mass has no room to expand in any reasonable container, or when a portion of the plant shows clear rot or damage that needs to come out.
Read the plant: what healthy ZZ rhizomes look like
A healthy rhizome is firm, opaque, and tan, white, or pale orange in color. Under firm thumb pressure it yields slightly and springs back. A soft, mushy, or wrinkled rhizome that collapses under light pressure is a rot indicator, especially if it is dark or smells sour. Surface rhizomes are easy to inspect without unpotting. If you can already see one and it looks plump and pale, that is a sign the plant is established. If the visible rhizomes look dark, soft, or unusually shriveled, take that as a warning sign before committing to division.
Pick the right moment: season, growth, and watering
Spring and early summer are the safer windows for division. The plant is in active growth, light levels are increasing, and the rhizomes can replace lost energy faster. In lower-light months, division is riskier because the plant uses less water, the mix stays wet longer, and freshly exposed rhizomes are more vulnerable to rot. The night before dividing, water the plant lightly if the mix is bone dry. It is easier to work with a slightly moist root ball than a dusty dry one, but you do not want it soggy.
Tools and prep: pot size, mix, and a clean surface
You do not need much.
- A clean, sharp knife or pair of pruners, wiped with isopropyl alcohol, kept on hand only in case the rhizomes do not separate by hand.
- New pots with drainage holes, each one to two inches wider than the rhizome clump you plan to put in it. Snug pots dry out faster and reduce rot risk.
- An airy, fast-draining mix. A cactus and succulent blend, or a standard peat-based mix amended with perlite, pumice, or coarse sand, both work. The label-reading framework in the potting mix guide covers the basics of what to look for.
- A clean sheet of paper or newspaper on the work surface.
- Gloves, since ZZ tissue contains calcium oxalate and can irritate skin, cuts, or eyes. Wash hands and tools after handling.
Step-by-step: lifting the plant and finding the natural seams
- Tip the pot on its side and gently work the plant loose. A mature ZZ root mass can be tight; run a dull knife or a chopstick around the inside edge of the pot if it is stuck.
- Lift the whole plant out and set it on your work surface. Do not pull stems.
- Shake or tease off loose mix. Use a soft brush or a gentle stream of lukewarm water to expose the rhizomes. You are looking for the natural seams where one rhizome cluster ends and another begins.
- Identify the divisions. The safer target is two to three rhizomes with attached stems per clump. The minimum is one firm rhizome with at least one stem or a visible growth point. Very small divisions will take longer to fill out but are still viable.
- Discard any soft, dark, or smelly rhizomes. A divided ZZ is also a chance to clean up rot, not rescue it.
Separating the rhizomes: tease first, cut only if needed
Start with your hands. Most of the time, the rhizomes will separate cleanly along the seams once the mix is out of the way. Work slowly and resist the urge to pull. If a connection is fibrous and tangled, your fingers are usually enough to tease it apart.
If two rhizomes are fused or so tightly knotted that hand separation would tear them, use the clean blade. Make one clean cut rather than a sawing motion, and let the cut face dry in open air for a day or two before potting. As a general propagation practice rather than a ZZ-specific guarantee, a clean wound will typically callus over enough to handle normal potting mix in normal indoor air. If a rhizome snaps rather than separates cleanly, the viable portion can still be potted once the break has dried.
Potting each division: small pots, dry mix, shallow depth
Place a small amount of mix in the bottom of each new pot. Set the rhizome so the top sits at or just below the surface, the same depth it was growing at before. Add mix around the sides and tap the pot to settle it. Do not press down hard. Leave a finger-width of space at the top for watering. Make sure the new pot has a drainage hole. A ZZ in a pot without drainage is a rot risk regardless of how carefully you divided it.
The first two weeks: dry, shaded, and mostly hands-off
Watering is the single most important decision in the first two weeks. Hold watering for several days after potting. The rhizome has stored water and does not need to be soaked in. Cut surfaces and exposed root tissue are at their most rot-prone when wet.
While the divisions are settling, place them in bright indirect light and avoid direct sun on freshly potted rhizomes. Skip the fertilizer. The ZZ plant care guide is clear that ZZ prefers a restrained feeding schedule, and a freshly divided plant has no need for extra nutrients. Check moisture by pot weight or by the top inch of mix before even thinking about watering. When you do resume, soak the pot thoroughly and let it drain completely. For a fuller walk-through of the weeks after repotting, see the care after repotting guide. Stability matters more than optimization in the first two weeks, so do not move the pots around to chase better light.
Realistic recovery: when new growth actually returns
A divided ZZ looks like a plant that is doing nothing for a long time. That is normal. ZZ grows slowly even on healthy plants, and a divided plant has fewer reserves than an undivided one. New shoots can take weeks to appear, and sometimes a single stem yellows or drops without taking the rest of the clump down. The rhizome may still push a new shoot from the same growth point.
Signals that the division is working include a rhizome that stays firm when you press on it, remaining stems that hold their posture even if they do not grow, and a mix that dries out on a reasonable schedule for the pot size and the room. Signals that the division has failed include a rhizome that is softening or collapsing, a sour smell from the pot, stems that stay limp even after the standard dry-down rhythm resumes, and yellowing that progresses from one stem to the whole clump rather than stabilizing on a single stem. Limpness alone does not equal failure; it can simply mean the plant needs more time.
If you see early failure signs, unpot, trim the soft tissue with a clean blade, let the wound dry, and repot into a smaller container with a drier mix. Sometimes a second attempt is enough. Sometimes the rhizome is too far gone to save.
When division is not the answer: alternatives worth knowing
A ZZ with a single dense, knotted rhizome mass and no obvious seams is a poor division candidate. Trying to force the separation usually means excessive cutting, which raises rot risk. In that case, up-potting into a slightly larger container is the safer move.
If the goal is more plants but the parent is fragile, single-leaf or stem cuttings in water or mix are a slower but lower-risk option. They take many months to produce a rhizome and do not give you an instant full plant, but they avoid unpotting a stressed plant altogether. Stem-cutting propagation is a different topic and is covered in the broader ZZ care hub rather than in this article.
Troubleshooting: mushy rhizomes, shrivelled stems, and slow regrowth
Mushy rhizomes are most often a sign of pre-existing rot, or of watering too soon after potting. Remove the soft tissue with a clean blade, let the cut face dry, and repot in a smaller container with a drier mix.
Shrivelled but firm stems usually mean the rhizome is using stored water to support the stem while roots re-establish. With normal watering rhythm, the stem often plumps back up over the following weeks.
Slow regrowth is normal. Unless you see active rot or collapsing stems, give the plant time.
A clean break that did not separate cleanly can still be potted once the break has callused. Discard any portion that is soft or dark.
A short aftercare checklist
- One to two inches of space around the rhizome clump in each new pot, with a drainage hole.
- An airy, fast-draining mix.
- No water for several days, then resume only after the first dry-down.
- Bright indirect light, with no direct sun on freshly potted rhizomes.
- No fertilizer until active new growth returns.
- Patience. Weeks of apparent stillness are normal, and a single yellowed stem does not mean the whole division failed.
- Wash hands and tools after handling. ZZ tissue contains calcium oxalate and can irritate skin, cuts, or eyes. If a pet or child is in the home, verify safety for the species with a veterinarian or a resource such as the ASPCA plant database, and contact poison control or your vet if ingestion is suspected.
Sources
- ZZ plant, Michigan State University Extension
- Dividing perennials, Clemson University Home and Garden Information Center
- Simple plant propagation: dividing, cutting, seeding, Colorado State University Extension
- Dividing a Zamioculcas zamiifolia, Jack Wallington
- From A to ZZ plant, The Sill
- ZZ plant care tips, Joy Us Garden
- ZZ plant care guide, Merrifield Garden Center